
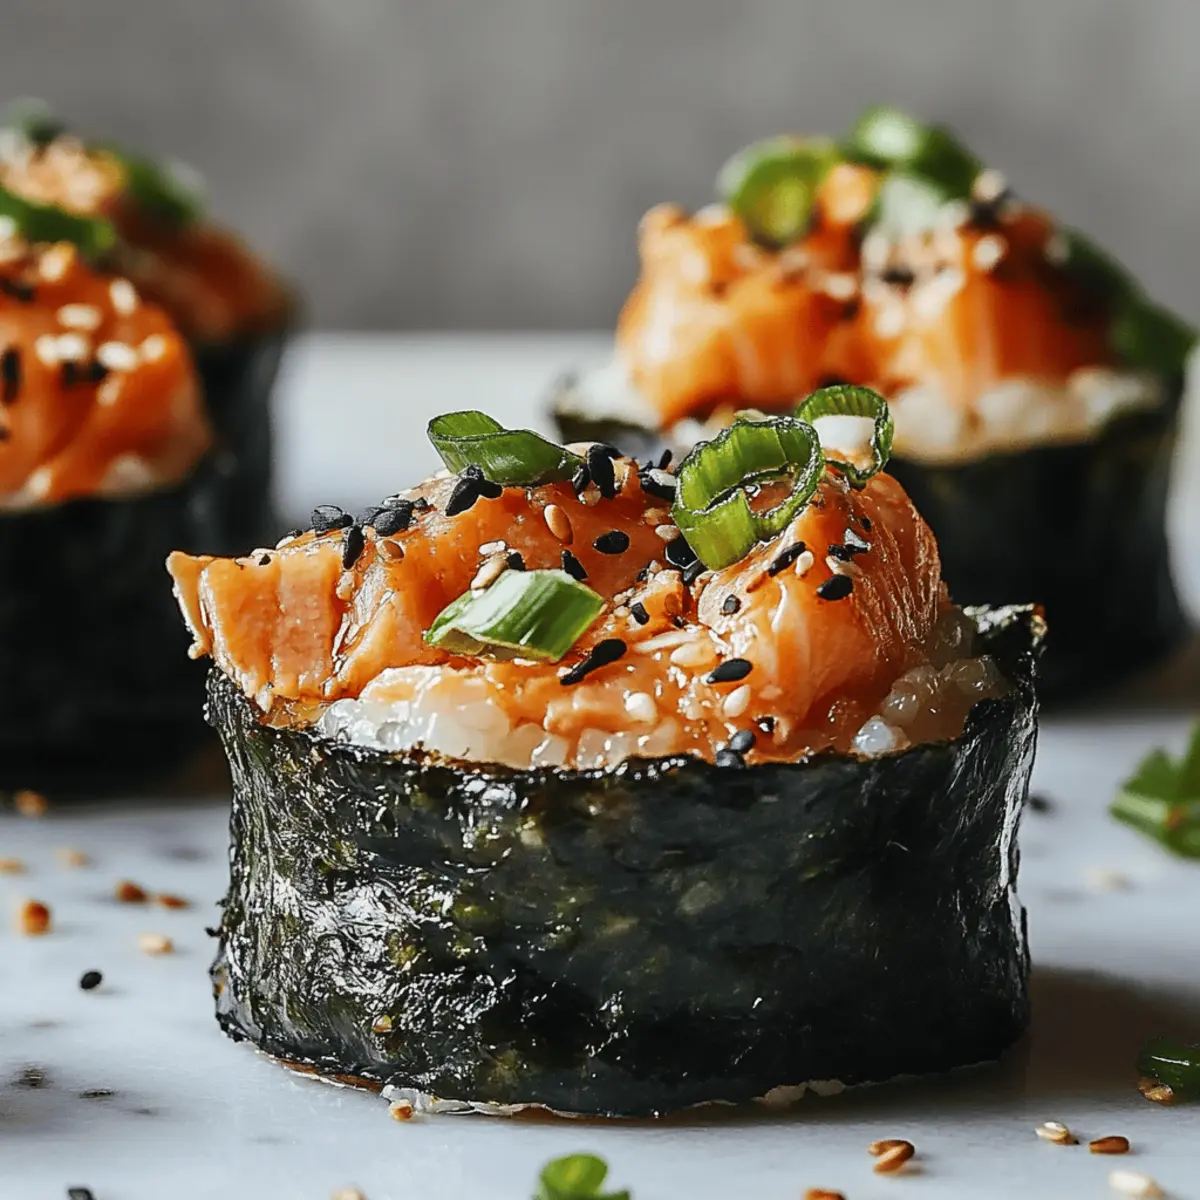
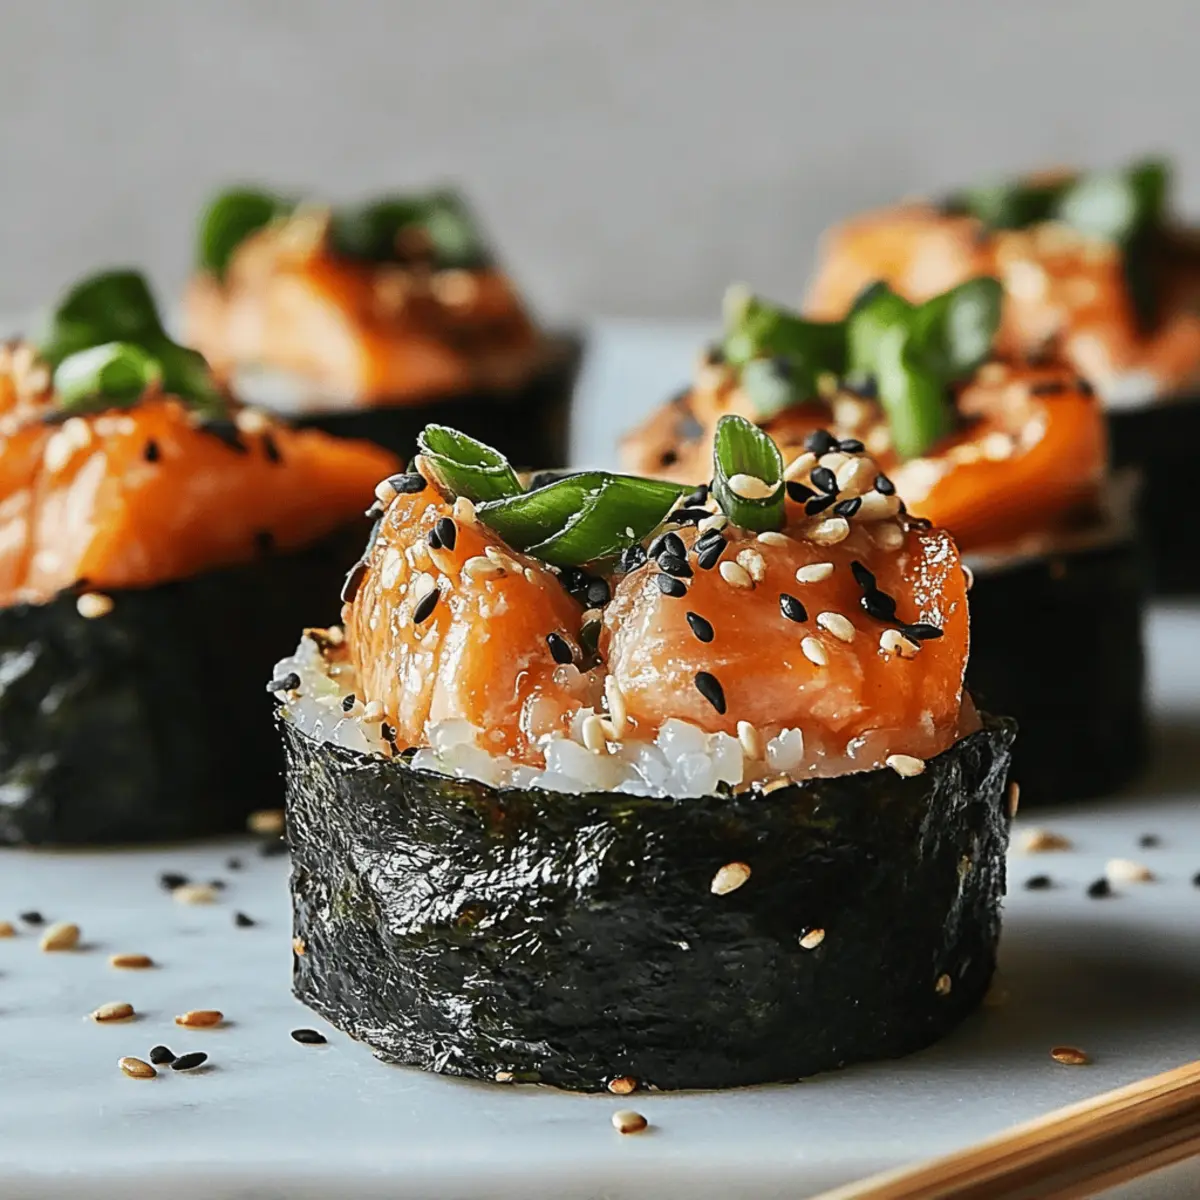
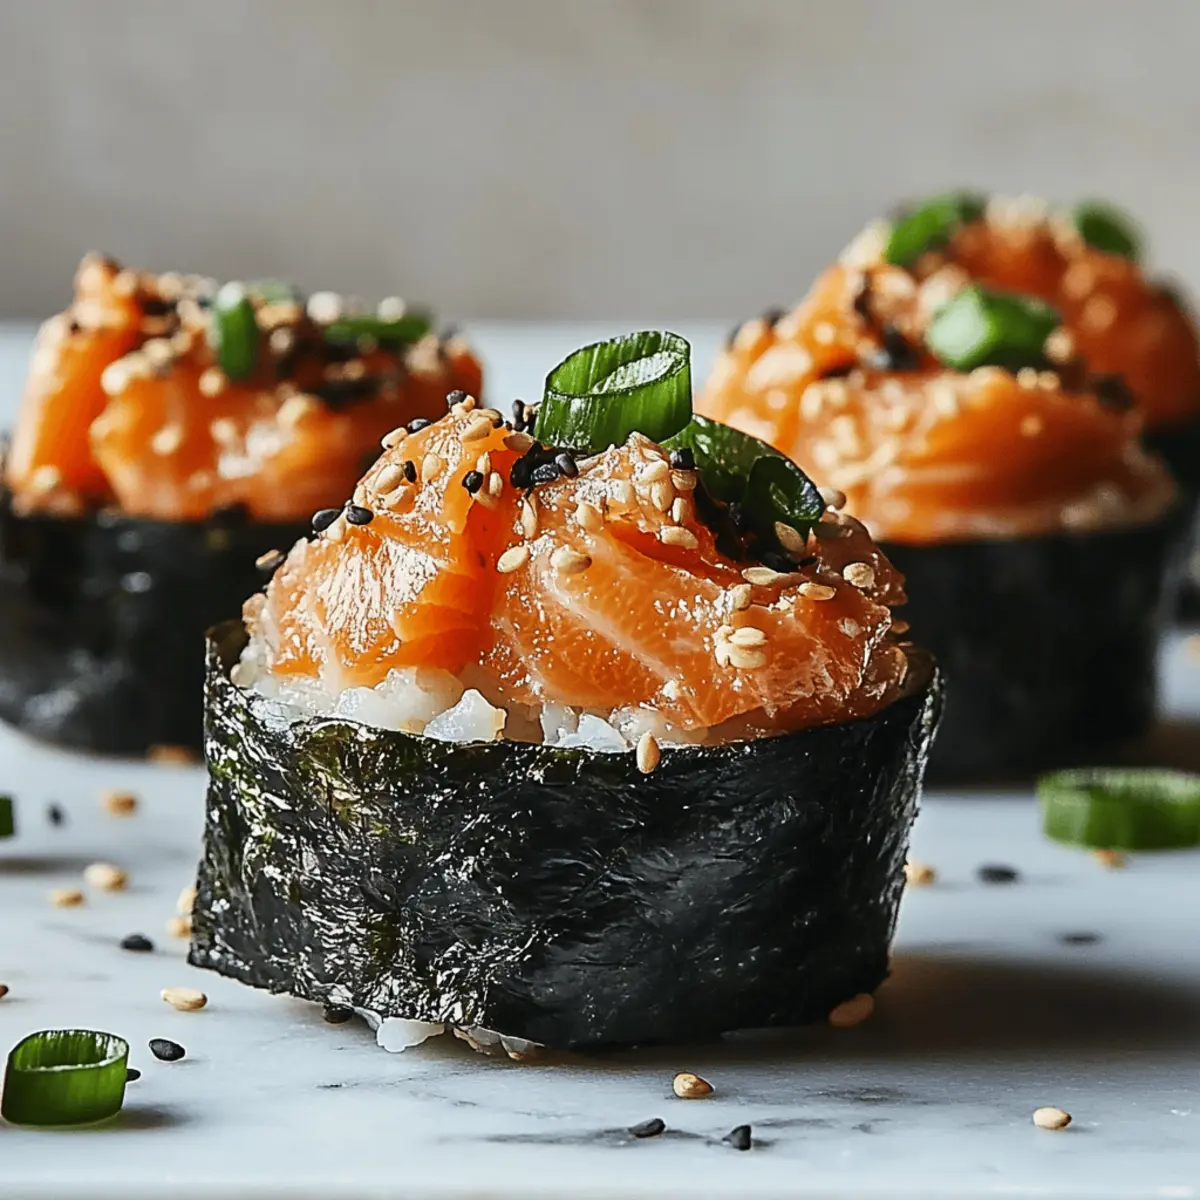
Have you ever found yourself craving a gourmet sushi experience without the roll-up hassle? Enter the Baked Salmon Sushi Cups, a carefree twist on your favorite Japanese dish that allows you to savor the flavors of fresh salmon and sushi rice without any complicated techniques. These delightful bites are not only a breeze to whip up, but they're also versatile—perfect as an appetizer for gatherings or a light lunch that feels fancy yet comforting. Plus, the easy cleanup means you can enjoy the moment with friends and family without getting overwhelmed. Ready to impress your taste buds with this cozy sushi delight? Let’s dive into the recipe!
Why Are Baked Salmon Sushi Cups Amazing?
Easy to Make: These Baked Salmon Sushi Cups require minimal culinary skills, making them perfect for beginners and seasoned chefs alike.
Flavor Explosion: The tender salmon paired with creamy mayo and sesame oil delivers a taste sensation that will leave your taste buds craving more!
Customizable Delight: Feel free to swap in your favorite proteins or add toppings like wasabi mayo for a personalized touch.
Perfect for Any Occasion: Whether you’re hosting a party or enjoying a cozy night in, these sushi cups are sure to impress guests or satisfy your cravings.
Quick Cleanup: With just a muffin tin and a few mixing bowls, you’ll spend less time cleaning and more time enjoying quality moments around the table.
These Baked Salmon Sushi Cups not only promise incredible flavor but can also be served alongside fresh seaweed salad or pickled ginger to elevate your dining experience!
Baked Salmon Sushi Cups Ingredients
For the Filling
• Fresh Salmon – The star ingredient that provides a rich, flavorful base; can be substituted with shrimp, tuna, or crab.
• Scallions – Adds a refreshing crunch; feel free to adjust the quantity to suit your taste.
• Japanese Mayo (e.g., Kewpie) – Elevates the filling with creaminess; substitute with regular mayo mixed with rice vinegar and sugar for a similar taste.
• Toasted Sesame Oil – Infuses a delightful nutty flavor; a little goes a long way!
• Sriracha – Provides a kick of spice; adjust the amount to control the heat level.
• Kosher Salt – Enhances the overall flavor profile of the filling.
For the Nori Cups
• Nori Sheets – The foundation of each sushi cup; ensure they're crisp to hold the filling perfectly.
• Sushi Rice – This short-grain rice forms the base and adds stability; it’s critical for that authentic sushi texture.
With these ingredients in hand, you are just moments away from creating unforgettable Baked Salmon Sushi Cups that will delight your family and friends!
Step‑by‑Step Instructions for Baked Salmon Sushi Cups
Step 1: Preheat the Oven
Begin by arranging your oven rack in the upper third position and preheating your oven to 400°F (200°C). This temperature is essential for achieving that crisp layer on your nori cups while ensuring the salmon is cooked perfectly. While the oven warms up, you can prepare your muffin tin.
Step 2: Prepare the Muffin Tin
Lightly spray a 12-cup muffin tin with cooking spray to prevent your crispy nori cups from sticking. Make sure to cover each cup evenly for easy removal once the Baked Salmon Sushi Cups are done. This step is crucial for maintaining the shape and integrity of your sushi cups.
Step 3: Form Nori Cups
Take your nori sheets and cut them into squares, roughly 5x5 inches. Press a small amount of sushi rice into the center of each piece, using your fingers to gently mold it around the edges, forming a cup shape. Aim for a solid base that can hold the filling and ensure the rice sticks together well.
Step 4: Mix the Filling
In a mixing bowl, combine cubed fresh salmon, finely chopped scallions, a drizzle of toasted sesame oil, and half the Japanese mayo and sriracha. Season with kosher salt to taste. Stir the mixture gently until the salmon is evenly coated, creating a colorful and flavorful filling for your Baked Salmon Sushi Cups.
Step 5: Fill the Nori Cups
Spoon the salmon mixture equally into each rice-lined nori cup in the prepared muffin tin. Make sure you fill each cup generously without overpacking them, allowing the flavors to meld as they bake. Each cup should be a delightful combination of rice, nori, and salmon.
Step 6: Bake
Place the muffin tin in the preheated oven and bake for approximately 11 minutes. Keep an eye on the salmon; it should appear just cooked through but still tender. The nori cups will begin to crisp up nicely, creating an enticing golden color.
Step 7: Broil for Extra Crisp
Once baked, switch your oven to the broil setting and broil the Baked Salmon Sushi Cups for an additional 2 to 4 minutes. Watch closely during this step to prevent any burning; you’re looking for a light char on the nori edges for added flavor and texture.
Step 8: Cool & Garnish
Remove the muffin tin from the oven and let the cups cool slightly for two to three minutes. Prepare a drizzle of spicy mayo by mixing the remaining mayo and sriracha, then drizzle it over the cooled sushi cups. Garnish with sesame seeds and more scallions before serving for a beautiful presentation.
Make Ahead Options
These Baked Salmon Sushi Cups are perfect for meal prep enthusiasts looking to save time on busy weeknights! You can assemble the nori cups and fill them with the salmon mixture up to 24 hours in advance. Simply prepare the sushi rice and press it into the nori, then fill with the salmon filling. Cover the muffin tin tightly with plastic wrap and refrigerate until you're ready to bake. To maintain quality, bake them fresh just before serving—this way, you’ll ensure that the nori remains crispy and the salmon is perfectly tender. Just pop them in the oven for about 11 minutes, broil for a few minutes, and enjoy your hassle-free, delicious Baked Salmon Sushi Cups!
Storage Tips for Baked Salmon Sushi Cups
Fridge: Store leftover Baked Salmon Sushi Cups in an airtight container in the fridge for up to 2 days. Keeping them sealed helps preserve their flavor and texture.
Freezer: For longer storage, freeze the assembled cups (without baking) wrapped tightly in plastic wrap and foil for up to 3 months. When ready to bake, bake from frozen, adding a few extra minutes to the cooking time.
Reheating: To maintain crispiness, reheat in a toaster oven rather than a microwave, which can make the nori soggy. Heat at 350°F (175°C) for about 5-7 minutes.
Make-Ahead Tip: You can prepare the filling and Nori cups ahead of time. Assemble and bake just before serving for the best quality and freshness!
What to Serve with Baked Salmon Sushi Cups
Elevate your dining experience with accompanying dishes that beautifully complement the delicate flavors of these delightful sushi cups.
-
Crisp Seaweed Salad: A refreshing, light salad that offers a contrast in texture and a touch of umami flavor to enhance your meal.
-
Pickled Ginger: This tangy side not only cleanses the palate but also adds a zesty pop, balancing the richness of the salmon nicely.
-
Cucumber Salad: Refreshingly crunchy, a simple cucumber salad with a citrusy dressing adds brightness and is the perfect non-heavy side dish.
-
Miso Soup: The savory, warm broth of miso soup pairs well, adding a comforting element to your meal that echoes traditional Japanese cuisine.
-
Soy Sauce Dipping: A small dish of soy sauce for dipping can provide an extra layer of flavor that elevates each sushi cup.
-
Sake or Green Tea: Complement the meal with a light, crisp sake or brewed green tea, enhancing the overall experience while keeping it authentic.
-
Mochi Ice Cream: Conclude on a sweet note with mochi ice cream for a delightful, chewy treat that mirrors the Japanese theme while satisfying your sweet tooth.
-
Sesame Seed Cookies: For dessert, these subtly sweet cookies echo the sesame flavors in the sushi cups and make a lovely finishing touch.
Baked Salmon Sushi Cups Variations
Feel free to get creative with these delicious Baked Salmon Sushi Cups and make them truly your own!
- Seafood Swap: Substitute fresh salmon for shrimp, tuna, or crab. Each option brings a unique twist and flavor profile to your sushi cups.
- Spice Level: Adjust the amount of sriracha to make it milder or spicier. Want more heat? Add some chopped jalapeños for an extra kick!
- Creamy Twist: Use avocado instead of mayo for a creamy, fresh alternative. Avocado adds a buttery texture that complements the salmon beautifully.
- Veggie Delight: Swap some salmon for finely chopped vegetables like bell peppers and cucumbers. This creates a refreshing veggie version that everyone can enjoy.
- Savory Toppings: Garnish with sesame seeds, furikake, or sliced radishes. These toppings add delightful crunch and flavor to each bite.
- Herb Infusion: Mix in fresh herbs like cilantro or basil into your salmon filling for a fragrant twist. Fresh herbs can elevate the recipe to a whole new level!
- Soy Sauce Drizzle: Swap spicy mayo for a drizzle of soy sauce or teriyaki glaze for a savory finish that pairs wonderfully with the nori.
- Cooked Rice Alternative: Use quinoa or cauliflower rice instead of traditional sushi rice. This adds a nutritional boost for those seeking lower-carb options.
Whether elevating flavor or accommodating dietary preferences, these variations will ensure your Baked Salmon Sushi Cups cater to everyone’s palate. Want a refreshing side? Pair with fresh seaweed salad or pickled ginger for balance and contrast!
Expert Tips for Baked Salmon Sushi Cups
-
Freshness Matters: Use the freshest salmon you can find for the best flavor. Frozen salmon can work too; just ensure it's fully thawed.
-
Avoid Soggy Nori: Bake immediately after assembling the cups to prevent the nori from becoming soggy. If prepping ahead, store nori and filling separately.
-
Temperature Check: Cook the salmon until it’s just done. Overcooking can lead to a dry filling. Aim for a tender, juicy texture that shines in the Baked Salmon Sushi Cups.
-
Customize Wisely: Feel free to explore other proteins, like shrimp or crab. Just adjust cooking times based on the option you choose to maintain the ideal taste.
-
Perfect Drizzle: Make your spicy mayo drizzle smooth and creamy for an irresistible touch. A little extra on top makes each bite decadently delightful!
Baked Salmon Sushi Cups Recipe FAQs
How do I select the best salmon for my Baked Salmon Sushi Cups?
Absolutely! Look for fresh salmon with a bright, clear color without any dark spots or discoloration. It should also have a mild ocean scent. I recommend selecting sushi-grade salmon for the best taste and texture; it ensures the highest quality and safety for your dish. If using frozen salmon, make sure it is fully thawed and still bright in color.
What’s the best way to store leftover Baked Salmon Sushi Cups?
Very! Store your leftover sushi cups in an airtight container in the fridge for up to 2 days. This keeps them fresh while preserving their flavor. Just remember to keep any sauces, like spicy mayo, separate to avoid making the nori soggy. For an added touch, consider reheating them in a toaster oven; it helps maintain the crispness of the nori.
Can I freeze Baked Salmon Sushi Cups?
Absolutely! You can assemble the sushi cups and freeze them before baking. Wrap them tightly in plastic wrap and then foil for the best protection against freezer burn. They will keep well for up to 3 months! When you're ready to enjoy, bake from frozen at 400°F (200°C), adding an extra 2-4 minutes to the cooking time until they are heated through and crispy.
What if my nori cups turn soggy?
If you find your nori cups soggy, it might be due to assembling them too far in advance or not baking them right after preparation. To prevent this, I suggest preparing the nori and filling separately until you're ready to bake. If sogginess occurs, a quick broil can help rejuvenate the crispness!
Are there any dietary considerations for Baked Salmon Sushi Cups?
Definitely! If you have allergies, be mindful of the ingredients, especially the mayonnaise and seafood. You might substitute the salmon with a plant-based protein or a different seafood option like cooked shrimp or crab. For those concerned about pet safety, remember that ingredients like onions (found in scallions) can be harmful to pets. Always make sure to keep such ingredients away from furry friends.

Baked Salmon Sushi Cups – Easy Appetizer Everyone Will Love
Ingredients
Equipment
Method
- Preheat the oven to 400°F (200°C) and arrange the oven rack in the upper third position.
- Lightly spray a 12-cup muffin tin with cooking spray.
- Cut nori sheets into 5x5 inch squares and mold sushi rice into the center of each piece, forming a cup.
- In a mixing bowl, combine fresh salmon, scallions, toasted sesame oil, half of the mayo, and sriracha. Season with salt and mix gently.
- Spoon the salmon mixture into each rice-lined nori cup.
- Bake for approximately 11 minutes until the salmon is just cooked through.
- Switch to broil for an additional 2 to 4 minutes to crisp the nori.
- Let cool for 2 to 3 minutes, then drizzle with spicy mayo, and garnish with sesame seeds and scallions.


Leave a Reply