
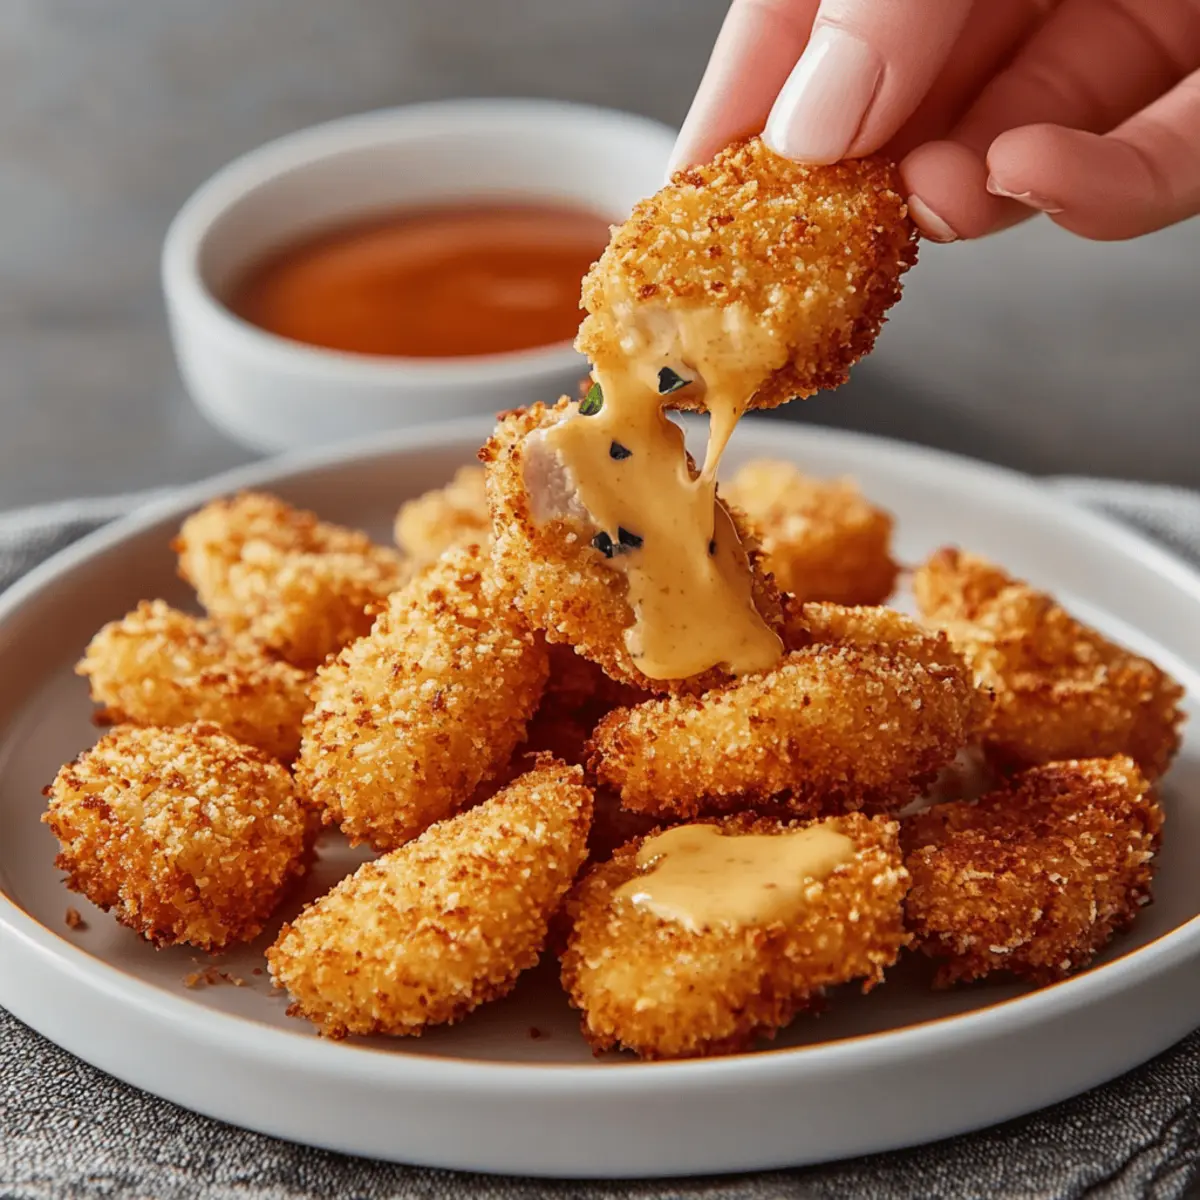
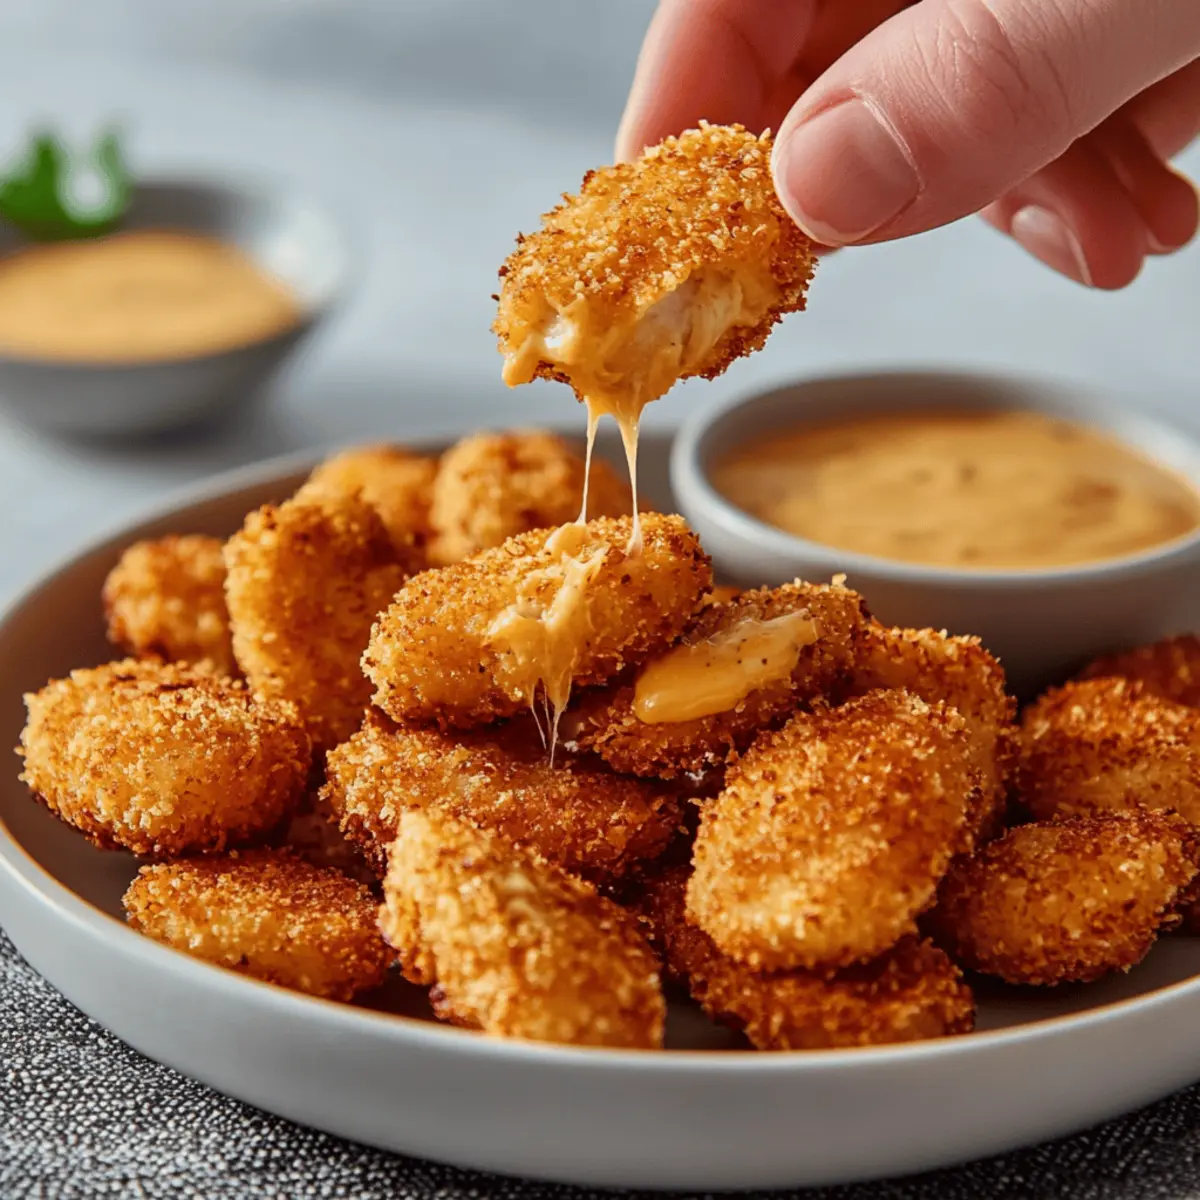
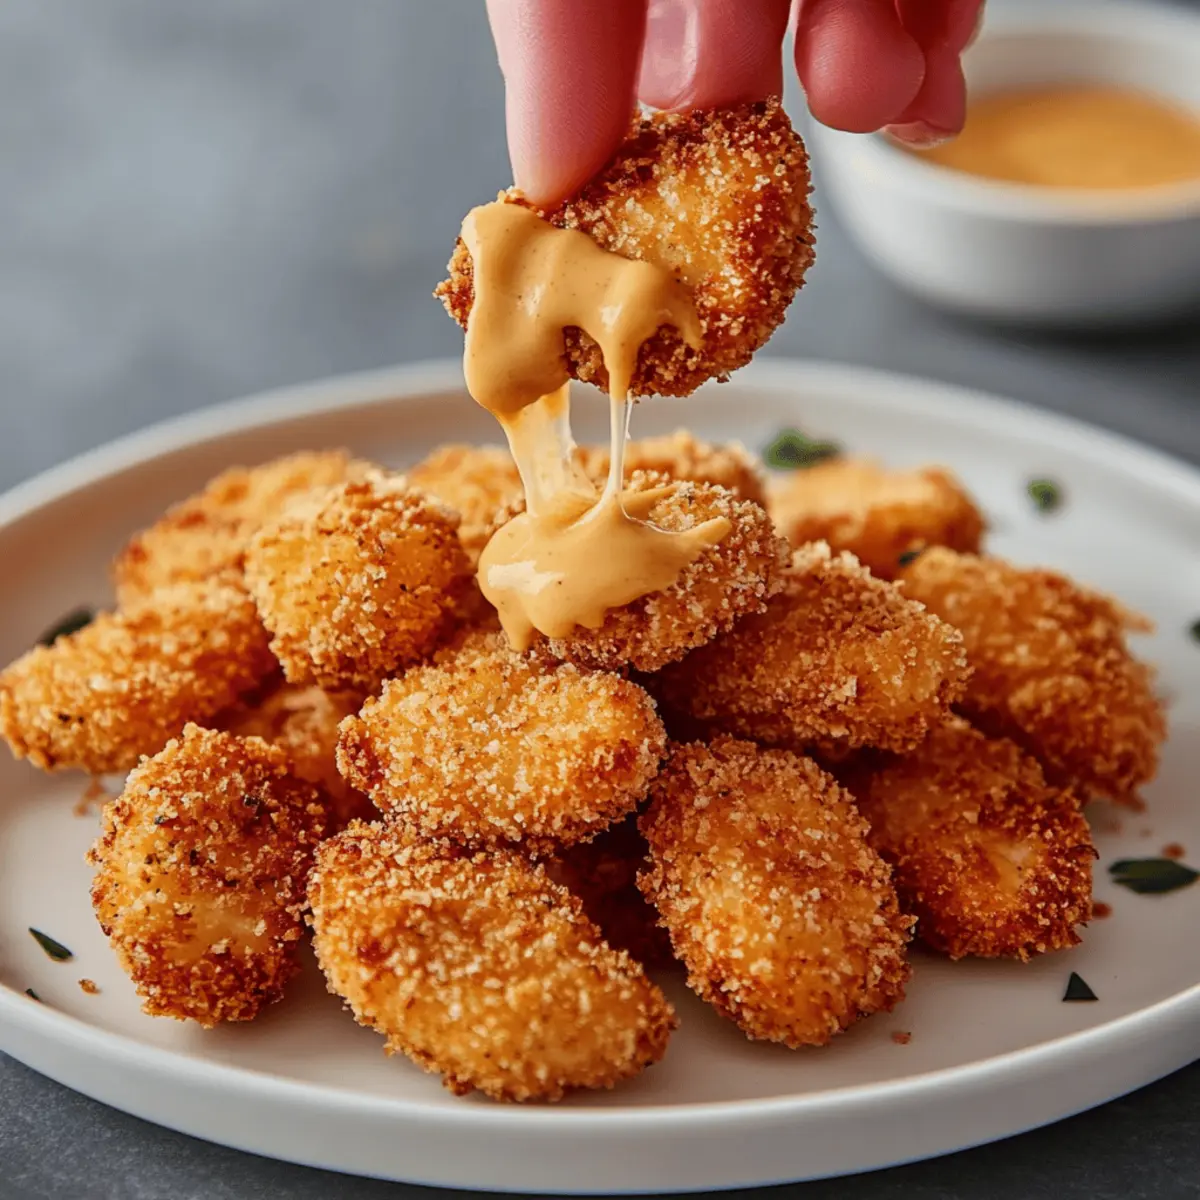
As I stood in my kitchen, the aroma of toasted breadcrumbs filled the air, instantly transporting me back to childhood meals that brought pure joy. Today, I’m excited to share my recipe for Baked Chicken Nuggets with Crispy Panko Coating—a healthier twist on a classic favorite. These nuggets are not only a delight to both kids and adults but also come together quickly, making them perfect for busy weeknights. With their satisfying crunch and tender chicken inside, they’re sure to become a family favorite. Best of all, they are baked instead of fried, so you can feel good about serving them. Are you ready to whip up a batch of these delicious nuggets and experience that nostalgic flavor in your home? Let’s dive in!
Why Are These Nuggets So Irresistible?
Crispy Crunch: The panko coating provides an extraordinary crunch that elevates each bite. Toasting the breadcrumbs truly brings out their nutty flavor, making them deliciously addictive.
Healthier Option: Enjoy a comforting classic that’s baked, not fried, allowing you to savor the taste without the guilt. These Baked Chicken Nuggets are a whimsical, healthier alternative to fast-food nuggets.
Kid-Approved: With their crunchy exterior and juicy interior, they will have the little ones begging for more! Pair them with your favorite dips like ranch or BBQ sauce, and it’s an instant family hit.
Quick and Easy: This recipe comes together in just a few simple steps, perfect for busy weeknights or unexpected guests. If you love quick meals, check out this recipe to save time! No need for complex culinary skills—just a few ingredients and a little love in the kitchen.
Versatile Flavor: Feel free to experiment with your favorite spices or serve with various dipping sauces to suit everyone’s taste buds, from honey mustard to spicy sriracha! With so many options, you’ll never tire of this delightful dish.
Baked Chicken Nuggets with Crispy Panko Coating Ingredients
Get ready to gather everything you need for these delightful nuggets!
For the Coating
- Panko Breadcrumbs – A crunchy texture that’s toasted to enhance flavor; for gluten-free, swap with gluten-free panko.
- Vegetable Oil – Helps the panko stick and crisp up; olive oil or avocado oil works as a fantastic alternative.
- Garlic Powder – Imparts depth of flavor; for a stronger taste, use fresh garlic as a substitute.
- Onion Powder – Enhances seasoning; feel free to omit if you want a simpler flavor profile.
- Black Pepper – Adds just the right amount of spice; adjust according to your family’s taste preference.
- Paprika – Introduces smokiness and a pop of color; you can swap it with cayenne pepper for an extra kick.
- Kosher Salt – Essential for flavor enhancement; sea salt can be used instead if desired.
For the Chicken
- All-Purpose Flour – Used for dredging the chicken to help the coating adhere; substitute with a gluten-free flour blend if needed.
- Egg – Acts as a binder for the coating; for a vegan option, try a flax egg.
- Boneless Chicken Breast – The star ingredient; chicken thighs can be used for a juicier texture.
Unleash the flavor with these Baked Chicken Nuggets with Crispy Panko Coating, and enjoy every delectable bite!
Step‑by‑Step Instructions for Baked Chicken Nuggets with Crispy Panko Coating
Step 1: Preheat the Oven
Begin by preheating your oven to 400°F (200°C). This temperature ensures that your Baked Chicken Nuggets with Crispy Panko Coating will achieve that perfect golden-brown color and crispiness. As the oven heats, prepare your baking sheet by lining it with parchment paper for easy cleanup and to prevent sticking.
Step 2: Toast the Panko
In a large bowl, toss the panko breadcrumbs with a splash of vegetable oil until evenly coated. Spread the mixture out on your prepared baking sheet and place it in the oven. Toast the breadcrumbs for 3-5 minutes or until they turn a golden brown, stirring halfway through to avoid burning. This step enhances the flavor and crunchiness of the coating.
Step 3: Mix the Seasoning
Once the panko is toasted, remove it from the oven and allow it to cool slightly. In a large mixing bowl, combine the toasted panko with garlic powder, onion powder, black pepper, paprika, and kosher salt. Stir well to ensure all the spices are evenly distributed, creating a deliciously seasoned coating for your chicken nuggets.
Step 4: Set Up a Breading Station
Prepare your breading station by placing all-purpose flour in a shallow dish and whisking the egg in another dish until well-beaten. This setup will help organize the process of coating the chicken, ensuring every piece is perfectly covered. It also makes the breading process smooth and efficient.
Step 5: Prepare the Chicken
Take your boneless chicken breast and cut it into bite-sized pieces, about 1-2 inches in size. Season the chicken pieces generously with kosher salt to enhance their natural flavor. This is the first step to ensuring your Baked Chicken Nuggets with Crispy Panko Coating are flavorful and tender.
Step 6: Dredge and Coat the Chicken
Now, take each piece of seasoned chicken and dredge it in the flour, ensuring it’s fully coated. Next, dip it in the beaten egg, allowing any excess to drip off. Finally, roll the chicken in the seasoned panko mixture, pressing gently to help the coating adhere. Repeat this process until all chicken pieces are coated.
Step 7: Arrange and Bake
Place the breaded nuggets on a wire rack set over a baking sheet. This promotes even cooking and crispiness by allowing air to circulate around the nuggets. Bake in the preheated oven for 15-18 minutes, or until they are golden brown and reach an internal temperature of 165°F (74°C). Keep an eye on them to ensure they don’t over-bake.
Step 8: Serve and Enjoy
Once the nuggets are golden and cooked through, remove them from the oven and let them cool slightly. Serve your Baked Chicken Nuggets with Crispy Panko Coating hot, accompanied by your favorite dipping sauces like ranch, BBQ, or honey mustard. These delicious, homemade nuggets are sure to be a hit with the whole family!
Expert Tips for Baked Chicken Nuggets
-
Even Toasting: Ensure your panko breadcrumbs are uniformly toasted to enhance flavor and prevent burning. Pay attention during this step for better results.
-
Dredge Properly: Dredge the chicken well in flour before dipping in egg to create a solid base for your Baked Chicken Nuggets with Crispy Panko Coating.
-
Use a Wire Rack: Baking on a wire rack allows hot air to circulate around the nuggets, ensuring they cook evenly and maintain their crispiness.
-
Watch the Time: Keep a close eye on baking time. Overcooking can lead to dry chicken; an instant-read thermometer is your best friend for checking doneness.
-
Experiment with Spices: Don’t be afraid to customize your seasoning! Adding different spices can yield uniquely flavored nuggets that suit everyone’s taste.
-
Reheat Carefully: For leftovers, reheat in a 375°F oven for optimal crispiness. This method keeps your nuggets crunchy and delicious!
What to Serve with Baked Chicken Nuggets with Crispy Panko Coating
Pair these delightful homemade bites with sides that complement their crunchy texture and juicy flavor, creating a wholesome family meal.
-
Crispy Oven-Baked Fries: Their golden, crunchy exterior perfectly mirrors the nuggets, making each bite a satisfying crunch. Add a sprinkle of sea salt to elevate the flavor.
-
Sweet Potato Wedges: Baked until tender and caramelized, these wedges offer a sweet contrast that balances the savory nuggets. Dip them in a tangy dipping sauce for an added kick!
-
Fresh Green Salad: A vibrant mix of greens and colorful veggies adds a refreshing crunch to your meal. Toss in some lemon vinaigrette to brighten up the flavors.
-
Macaroni and Cheese: Creamy and cheesy, this classic comfort food pairs perfectly with the crispy nuggets for a kid-approved plate. Plus, who can resist cheese?
-
Veggie Sticks with Hummus: For a nutritious touch, serve crunchy carrot and cucumber sticks alongside creamy hummus. It’s fresh, healthy, and adds extra texture to the meal.
-
Honey Mustard Dipping Sauce: Elevate your nugget experience with a homemade honey mustard. It adds a sweet and tangy flavor that’s irresistible when dipped!
-
Sparkling Lemonade: Refreshing and bubbly, this drink complements the nuggets and balances richer sides. The citrus notes add an uplifting component to your meal.
-
Chocolate Chip Cookies: End on a sweet note with warm, gooey cookies. Their comforting taste will have everyone leaving the table with a smile!
Make Ahead Options
These Baked Chicken Nuggets with Crispy Panko Coating are perfect for meal prep enthusiasts looking to save time during busy weeknights! You can prep the chicken nuggets up to 24 hours in advance. Simply bread them as instructed and arrange them on a baking sheet lined with parchment paper, then cover and refrigerate. For optimal texture, it’s best to bake them right before serving; just pop them in the preheated oven for 15-18 minutes until they're golden and crispy. If you want to make an even larger batch, you can freeze the uncooked, breaded nuggets for up to 3 months—simply bake them from frozen, adjusting the cooking time as needed. With these tips, you’ll have deliciously satisfying nuggets ready at a moment's notice!
Baked Chicken Nuggets with Crispy Panko Coating Variations
Feel free to get creative with this recipe and tailor it to your family's tastes—imagine the delightful aromas and flavors that await!
- Chicken Thighs: Use boneless chicken thighs instead of breast for a juicier and richer taste.
- Gluten-Free: Substitute gluten-free panko and flour for a gluten-free version, making this dish inclusive for everyone.
- Vegan Option: Replace chicken with zucchini or eggplant slices and use a flax egg to keep the coating intact for a plant-based alternative.
- Flavor Boost: Experiment by adding Italian seasoning or cajun spices to the panko mixture for an adventurous twist.
- Smoky Heat: Swap paprika for smoked paprika or a touch of cayenne for a warm, smoky flavor that adds depth.
- Herbed Delight: Add fresh herbs like parsley or thyme to the panko for a burst of freshness and color.
- Parmesan Twist: Mix in some grated Parmesan cheese with the panko for an added layer of umami and crispiness.
- Dip Diversity: Serve these nuggets with an array of dips, from homemade guacamole to zesty tzatziki sauce for a flavor fiesta!
The possibilities are endless, so have fun exploring these variations! And if you want to expand your serving options, consider pairing them with crispy oven-baked fries or a refreshing green salad for a complete meal that delights the senses. Happy cooking!
How to Store and Freeze Baked Chicken Nuggets
Fridge: Store leftovers in an airtight container in the refrigerator for up to 3 days, placing paper towels inside to absorb excess moisture and keep them crisp.
Freezer: For longer storage, freeze uncooked breaded nuggets on a baking sheet until firm, then transfer to a freezer bag. They can be baked directly from frozen when you're ready to enjoy your Baked Chicken Nuggets with Crispy Panko Coating.
Reheating: Reheat in a preheated oven at 375°F (190°C) for about 10-15 minutes to restore the crispiness, avoiding the microwave, which can make them soggy.
Serving Tips: Once thawed and reheated, serve with your favorite dipping sauces to enhance flavor and make mealtime exciting again!
Baked Chicken Nuggets with Crispy Panko Coating Recipe FAQs
What is the best way to select ripe chicken for this recipe?
Absolutely! When choosing chicken for your Baked Chicken Nuggets with Crispy Panko Coating, look for boneless chicken breasts that are pink and firm to the touch. Avoid any meat that appears slimy or has dark spots, as these can indicate spoilage. Fresh chicken will have a mild smell, while a strong odor is a sign it’s best left behind.
How should I store leftovers?
You can store leftovers in an airtight container in the refrigerator for up to 3 days. I like to place paper towels inside the container to absorb moisture and keep the nuggets crisp. This trick really helps maintain their delicious crunch for a longer time!
Can I freeze the nuggets before baking?
Certainly! To freeze uncooked breaded nuggets, arrange them on a baking sheet in a single layer and freeze until firm, usually about 1 to 2 hours. Once firm, transfer them to a freezer bag, sealing it tightly. They can be baked directly from frozen, just add a few extra minutes to the baking time!
What if my nuggets don't turn out crispy?
Very good question! If your Baked Chicken Nuggets with Crispy Panko Coating aren't as crispy as you'd like, there are a few things to consider. Make sure your panko breadcrumbs are evenly toasted before coating, as this enhances their crunchiness. Also, using a wire rack while baking promotes even airflow, which is crucial for that perfect crisp. If you’ve overcooked them, they might also turn out dry, so aim for an internal temperature of 165°F and keep a close eye on baking time.
Are these chicken nuggets safe for children with allergies?
When it comes to dietary considerations, I recommend checking for allergies to the ingredients used, especially the egg and flour. You can substitute a flax egg for a vegan option or opt for gluten-free flour and panko for those with gluten intolerance. Always ensure to be cautious of cross-contamination if you're serving anyone with food allergies.
How do I make sure my breading adheres properly?
To ensure your panko coating sticks, dredge the chicken pieces in seasoned flour first, dip them in beaten egg to create a wet layer, and then roll them in the panko mixture. For best results, press the panko gently into the chicken so it adheres well before baking. This multi-step process really helps achieve that perfect crunchy coating that makes these nuggets irresistible!

Crispy Baked Chicken Nuggets with Panko Coating Made Easy
Ingredients
Equipment
Method
- Preheat your oven to 400°F (200°C) and prepare a baking sheet with parchment paper.
- In a large bowl, toss panko breadcrumbs with vegetable oil, then spread on the baking sheet and toast for 3-5 minutes.
- Combine toasted panko with garlic powder, onion powder, black pepper, paprika, and kosher salt in a bowl.
- Set up a breading station with flour in one dish and a beaten egg in another.
- Cut chicken into bite-sized pieces and season them with kosher salt.
- Dredge each piece of chicken in flour, dip in egg, and coat with the panko mixture.
- Place the coated chicken nuggets on a wire rack over a baking sheet, and bake for 15-18 minutes until golden brown.
- Let chicken nuggets cool slightly before serving with your favorite dipping sauces.
Leave a Reply