
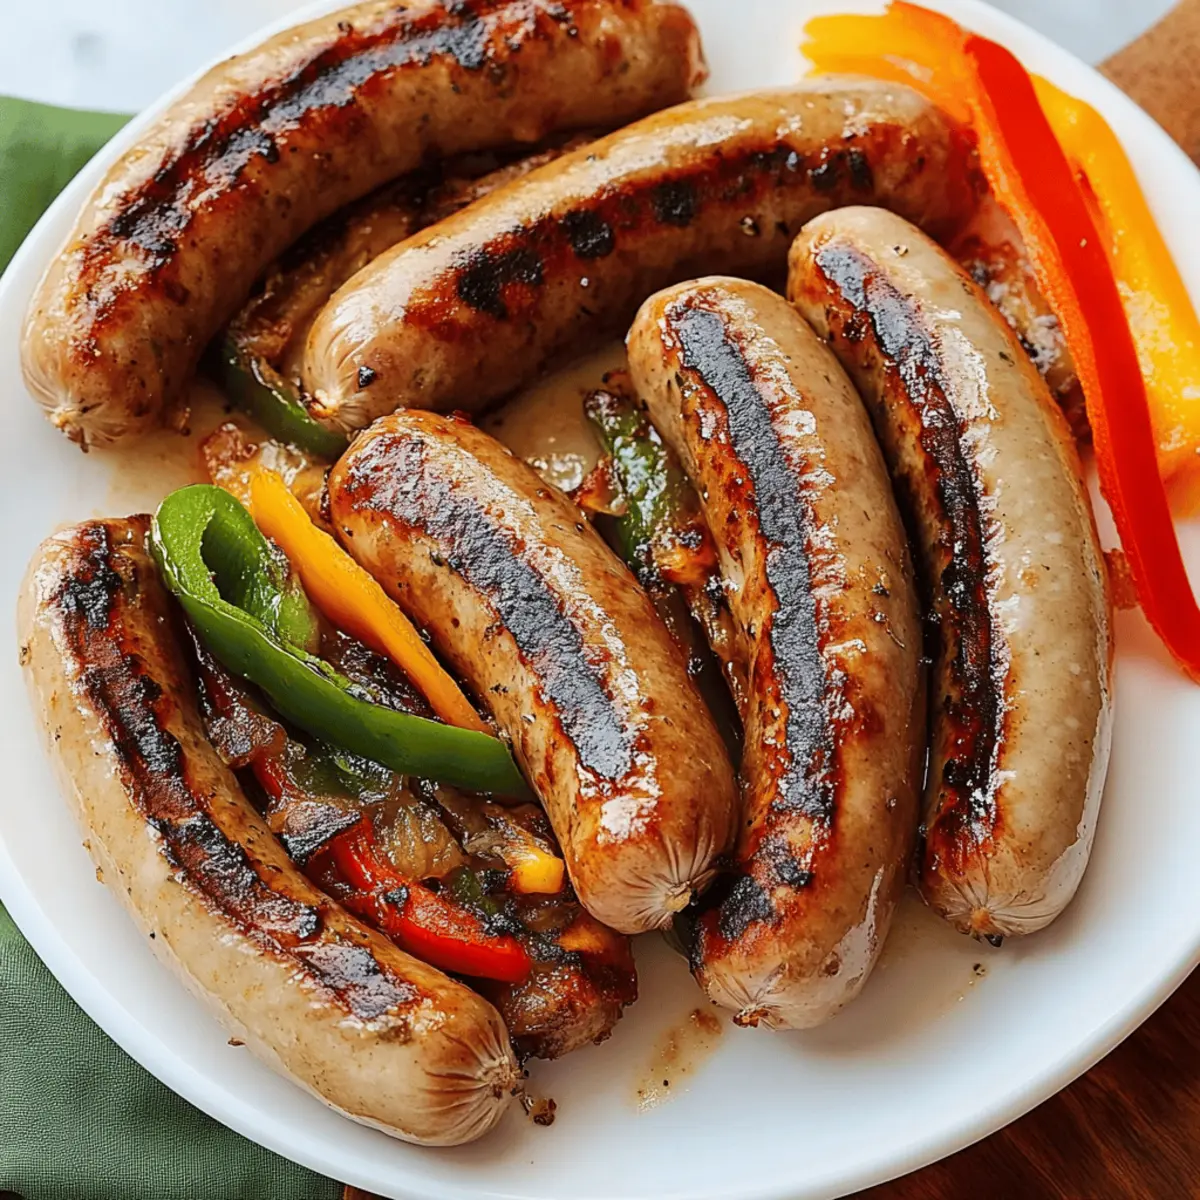
As I flipped the sausages on the grill, the enticing aroma of sizzling bratwursts mingled with the rich, hoppy scent of beer—a reminder of countless summer gatherings filled with laughter and good food. This Grilled Beer Brats recipe brings that same joy to your backyard or kitchen, making it perfect for cozy dinners or casual cookouts. Not only are these brats infused with the delightful flavors of caramelized onions and vibrant bell peppers, but they also offer a fun twist that lets you play with different beers and toppings. This dish excels at being a quick-prep crowd-pleaser, ensuring everyone leaves the table satisfied. So, are you ready to elevate your grilling game and make some unforgettable memories with delicious homemade beer brats?

Why Are Grilled Beer Brats a Must-Try?
Unforgettable Flavor: The combination of juicy bratwurst and beer-infused caramelized onions and peppers creates a decadent taste explosion that will have everyone asking for seconds.
Endless Customization: With the option to switch up sausages, beers, and toppings, each batch can be uniquely yours—perfect for impressing guests or a cozy family night.
Quick and Easy: This recipe requires minimal prep time and straightforward steps, allowing you to focus on enjoying cooking without the kitchen chaos.
Crowd-Pleasing Delight: Ideal for gatherings, these brats can easily satisfy a hungry crowd, making them a go-to for barbecues and parties alike.
Versatile Serving: Pair with sides like homemade coleslaw or sweet potato fries, or set up a build-your-own brat bar for a fun, interactive meal experience. Get ready to delight your taste buds with this delicious recipe!
Grilled Beer Brats Ingredients
For the Brats
• Bratwurst Sausages – Choose pork or beef for a juicy main protein.
• Beer – Select any lager, pale ale, or your favorite brew for a flavorful infusion.
For the Vegetables
• Onions – Opt for yellow onions, as they balance sweet and savory perfectly.
• Bell Peppers – Include any color of bell pepper to add freshness and a slight crunch.
For Assembly
• Whole-Grain Mustard – A tangy condiment that elevates the brat's flavor; try spicy brown as a substitute.
• Sauerkraut or Relish – Adds acidity and texture, enhancing the overall taste of your grilled beer brats.
Step‑by‑Step Instructions for Grilled Beer Brats
Step 1: Preheat Your Grill
Begin by preheating your grill to medium-high heat, reaching around 400°F. This ensures a beautifully charred finish on your bratwurst. While the grill heats up, gather a heavy, grill-safe cast-iron skillet to caramelize the onions and peppers as the sausages cook, enhancing the flavors of your Grilled Beer Brats.
Step 2: Grill the Bratwursts
Once the grill is hot, place the bratwursts directly onto the grill grates. Grill them for about 6 minutes, turning occasionally, until they are beautifully browned with a nice char. This initial grilling step adds a smoky flavor that perfectly complements the beer and caramelized veggies in the subsequent steps.
Step 3: Prepare the Vegetables
While your bratwursts are grilling, slice your onions and bell peppers into thin strips. Once the sausages are nicely charred, carefully transfer them to the preheated cast-iron skillet. Add the sliced onions and bell peppers around the bratwursts, allowing their natural sweetness to shine as they cook together.
Step 4: Simmer with Beer
Pour your chosen beer over the bratwursts and vegetables in the skillet, ensuring everything is well coated. Cover the skillet with a lid or aluminum foil, and allow it to simmer on the grill for about 20 minutes. This gentle simmer will infuse the bratwurst with flavor while caramelizing the onions and peppers, creating the rich taste profile characteristic of Grilled Beer Brats.
Step 5: Assemble Your Brats
After simmering, remove the skillet from the grill and let the bratwursts sit for a minute. Slice open your buns, and nestle the flavorful bratwursts inside. Top with the sweet caramelized onions and peppers, and drizzle with whole-grain mustard or your choice of sauerkraut or relish for that perfect, tangy finish.
Step 6: Serve and Enjoy
Serve your grilled beer brats immediately while warm. For an extra touch, consider offering a variety of toppings or condiments on the side. These delicious, savory bratwursts, bursting with flavor from the beer and accompanied by the caramelized vegetables, will have everyone coming back for more!

How to Store and Freeze Grilled Beer Brats
Fridge: Store leftover grilled beer brats in an airtight container for up to 3 days to maintain their flavor and juiciness.
Freezer: Wrap the bratwursts tightly in plastic wrap or aluminum foil, then place them in a freezer-safe bag. They can be frozen for up to 3 months for future meals.
Reheating: When ready to enjoy, thaw in the refrigerator overnight and reheat gently in a skillet or grill until heated through, avoiding dryness.
Separate Veggies: For best texture, store caramelized onions and peppers separately from the bratwurst.
Expert Tips for Grilled Beer Brats
- Char for Flavor: Allow bratwursts to char nicely on the grill before simmering; this adds a depth of flavor crucial to your grilled beer brats.
- Simmer Smartly: Avoid stirring too often while simmering onions and peppers; this keeps them textured and prevents mushiness in your dish.
- Pan Perfection: Use a heavy grill-safe skillet to ensure even heat distribution, preventing burning and ensuring the best caramelization of vegetables.
- Indoor Option: If grilling isn't possible, prepare your grilled beer brats on the stovetop in a grill pan; just maintain moderate heat for similar results.
- Experiment with Beers: Different beers encourage diverse flavor profiles; don’t hesitate to try a dark stout for richness or a light lager for a refreshing twist.
Grilled Beer Brats Variations & Substitutions
Feel free to personalize your grilled beer brats to suit your taste buds and dietary preferences!
- Spicy Kick: Add sliced jalapeños or a drizzle of hot sauce for an extra layer of heat.
- Smoky Flavor: Incorporate smoked sausage instead of traditional bratwurst for a deeply satisfying twist. The bold smokiness pairs beautifully with the caramelized onions.
- Vegetarian Option: Try using plant-based sausage alternatives to create a delicious veggie version that everyone can enjoy. Pair it with your favorite toppings to amplify the flavors!
- Gluten-Free: Opt for gluten-free bratwurst and use gluten-free buns for a delicious adaptation that doesn’t skimp on flavor. Your guests won't even notice the difference!
- Beer Variety: Experiment with seasonal craft beers or local brews; stouts can lend a rich, deep flavor, while pale ales might brighten the dish. Taste the difference in every bite.
- Gourmet Touch: Add gourmet toppings such as crumbled blue cheese or caramelized balsamic onions for an upscale twist that will impress even the most discerning palates.
- Herb Infusion: Sprinkle fresh herbs like basil or cilantro over the finished brats for a burst of freshness and color. This lightens the dish while adding an aromatic layer.
- Fruit Addition: Incorporate grilled pineapple or apple slices in the last few minutes of cooking for a sweet and savory contrast that will elevate your brat experience to new heights!
These variations not only enhance your grilled beer brats but also add unique spins that can cater to any guest's preference. For more crowd-pleasing ideas, consider serving them with sides like creamy coleslaw or a simple potato salad for a complete and satisfying meal!
Make Ahead Options
Grilled Beer Brats are an excellent choice for meal prep, especially for busy weeknights! You can slice the onions and bell peppers up to 24 hours in advance and store them in an airtight container in the refrigerator to maintain their crispness. Additionally, you can grill the bratwursts ahead of time and refrigerate them for up to 3 days. When you're ready to enjoy your brats, simply reheat the sausages in a skillet or on the grill for about 5 minutes until warmed through, then proceed with the simmering step in the beer with the prepped veggies. This way, you can savor the delicious flavors without the stress of last-minute cooking!
What to Serve with Grilled Beer Brats?
Elevate your grilling experience by pairing your delicious beer brats with mouthwatering sides that add layers of flavor and delight to your meal.
- Creamy Coleslaw: This crunchy and creamy side offers a refreshing contrast, balancing the richness of the bratwursts while adding vibrant color to your plate.
- Sweet Potato Fries: Their natural sweetness complements the savory brats beautifully, providing a satisfying crispness that everyone will love.
- German Potato Salad: Warm, tangy, and herb-infused, this dish enhances the German-inspired theme of your beer brats, making it a classic pairing.
- Grilled Corn on the Cob: Brush with butter and season with salt; the smoky flavors accentuate the grilled essence of the beer brats for a delightful, summery meal.
Add a fun twist by serving with a side of pickled jalapeños for an extra kick of spice!
- Fresh Garden Salad: Crisp greens tossed with a light vinaigrette add a refreshing element that counterbalances the richness of the bratwursts.
- Lager or Pale Ale: Sipping on the same beer used for cooking the brats heightens the flavor experience and keeps the vibes going all meal long.

Grilled Beer Brats Recipe FAQs
What type of beer should I use for grilling beer brats?
Absolutely! You can choose any beer you enjoy—lagers, pale ales, or even stouts bring unique flavors to the brats. Lagers will add a light, crisp note, while darker beers lend richness. Feel free to explore and have fun with different types!
How should I store leftover grilled beer brats?
Certainly! Store your leftover grilled beer brats in an airtight container in the fridge for up to 3 days. Make sure to separate the caramelized onions and peppers from the bratwursts for better texture when reheating.
Can I freeze grilled beer brats for later use?
Yes, you definitely can! To freeze, tightly wrap each bratwurst in plastic wrap or aluminum foil, then place them in a freezer-safe bag. They can be stored for up to 3 months. When you're ready to enjoy, just thaw them overnight in the refrigerator and reheat gently to keep them juicy.
What can I do if my sausages are overcooked and dry?
Oh no, that's a common concern! If your sausages end up dry, try slicing them and simmering them in a bit of broth or beer, covered, for about 10 minutes. This can help reintroduce moisture. For the future, keep an eye on the grilling time and use a meat thermometer; bratwurst should ideally hit around 160°F.
Are there any dietary considerations with grilled beer brats?
Very much so! If you're catering to dietary restrictions, consider using alternative sausages such as chicken, turkey, or even veggie options for non-meat eaters. Also, be cautious about beer choices if you have gluten sensitivities; opt for gluten-free beers available on the market. Always check ingredient labels for any allergens related to toppings like mustard or sauerkraut!
How can I enhance the flavor of my grilled beer brats?
Certainly! To boost flavor, consider marinating your bratwursts in your chosen beer for a few hours prior to grilling. Additionally, experiment with toppings such as pickled jalapeños or fresh herbs for a unique twist. Lastly, ensure your onions and peppers are well caramelized; they'll add a lovely sweetness that complements the savory sausage beautifully!
Savor Juicy Grilled Beer Brats with Sweet Caramelized Onions
Ingredients
Equipment
Method
- Preheat your grill to medium-high heat (around 400°F) to get a beautifully charred finish on your bratwurst.
- Grill the bratwursts for about 6 minutes, turning occasionally, until browned with a nice char.
- Slice onions and bell peppers into thin strips. Transfer bratwursts to a cast-iron skillet and add vegetables.
- Pour beer over bratwursts and vegetables, cover, and simmer for about 20 minutes.
- Remove skillet from the grill and let bratwursts sit for a minute before placing in sliced buns.
- Top bratwursts with caramelized onions and peppers, then drizzle with mustard or your choice of sauerkraut or relish.
- Serve immediately while warm, offering a variety of toppings on the side.
Leave a Reply