
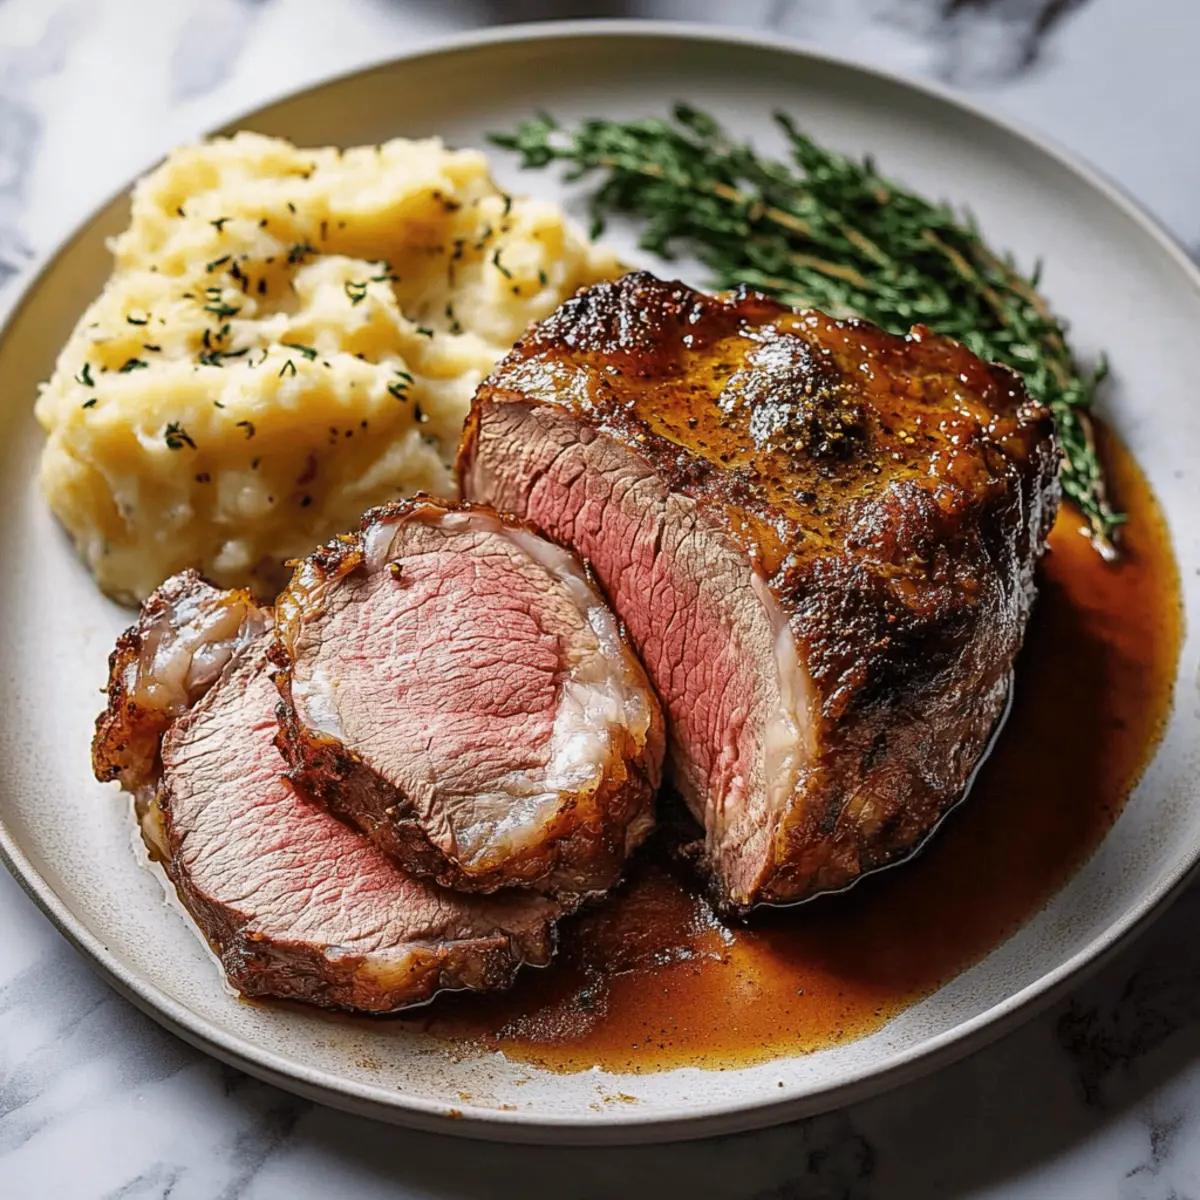
The aroma of a perfectly cooked roast wafts through the air, transporting me back to family gatherings where laughter and delicious food filled the room. Today, I’m excited to share my Reverse Sear Prime Rib recipe, a dish that promises a juicy interior and a beautifully caramelized crust—perfect for any special occasion. The low-and-slow roasting technique not only ensures phenomenal flavor but also makes the whole cooking process incredibly easy, offering a foolproof method for even novice chefs. With minimal prep time and the reward of that first tender bite, you'll find it becomes a favorite for holidays and cozy dinners alike. Are you ready to elevate your cooking game and impress your loved ones? Let’s dive in!
Why is Reverse Sear Prime Rib Amazing?
Unbeatable flavor: The reverse sear method enhances the beef's natural richness, creating a depth of taste that will have everyone coming back for seconds.
Easy preparation: With simple ingredients like kosher salt and fresh herbs, making this dish is as easy as it gets, even for beginners.
Perfect texture: Enjoy a prime rib that boasts a juicy interior paired with a perfectly caramelized crust, striking the ideal balance of textures.
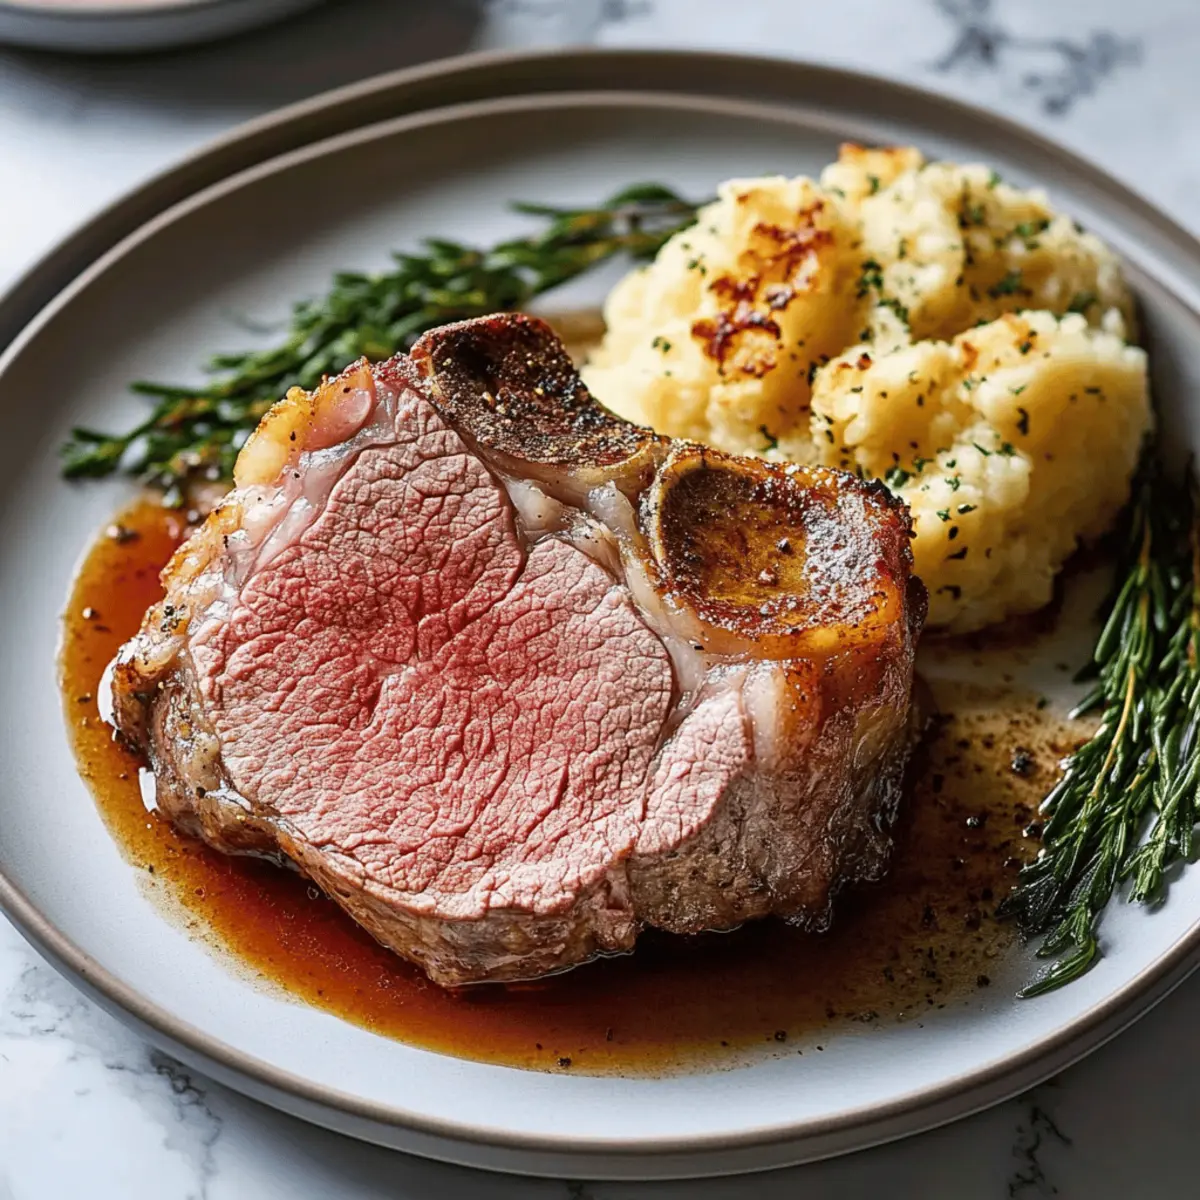
Impressive presentation: Serve this stunning roast at your next dinner party, and watch your guests marvel at your culinary skills!
The effort you put into crafting this Reverse Sear Prime Rib will be rewarded with admiration and empty plates. For side suggestions that perfectly complement your roast, don't forget to check out creamy mashed potatoes or garlic roasted baby carrots.
Reverse Sear Prime Rib Ingredients
• Get ready to savor the incredible flavors of the Reverse Sear Prime Rib with these essential ingredients!
For the Roast
- Kosher Salt – Enhances the natural beef flavor; generously cover the roast and refrigerate overnight for an intensified taste.
- Butter (softened, unsalted) – Adds rich moisture; for a lighter option, substitute with herb-infused oil.
For the Herb Blend
- Fresh Rosemary – Provides earthy notes; you can use dried rosemary in half the amount if fresh isn’t available.
- Fresh Thyme – Adds aromatic qualities; dried thyme is a suitable substitute, also in half the amount.
- Cracked Black Pepper – Enhances flavor with a mild heat; no need for substitution unless avoiding black pepper.
Step‑by‑Step Instructions for Reverse Sear Prime Rib
Step 1: Prepare Roast
Generously season the prime rib with kosher salt, ensuring all surfaces are well-coated. Place the seasoned roast uncovered on a rack in your refrigerator overnight. This step is crucial for enhancing flavor, allowing the salt to penetrate deep into the meat, resulting in a beautifully seasoned Reverse Sear Prime Rib.
Step 2: Room Temperature
Remove the roast from the fridge about an hour before cooking, allowing it to come to room temperature. This step ensures even cooking throughout the roast. You’ll know it's ready when the surface feels warm to the touch, eliminating the shock of cold meat hitting the oven.
Step 3: Make Herb Butter
In a mixing bowl, combine softened unsalted butter with finely chopped fresh rosemary, thyme, and cracked black pepper. This herb-infused butter will add depth to your Reverse Sear Prime Rib. Spread the mixture evenly over the entire surface of the roast, allowing the flavors to meld together beautifully.
Step 4: Preheat Oven
Preheat your oven to a gentle 200°F (93°C). Place your seasoned roast in a large roasting pan fitted with a rack to allow for air circulation. Slow roast the prime rib while monitoring the internal temperature; cook until it reaches 115°F (about 3½ to 4 hours), ensuring an evenly cooked, juicy result.
Step 5: Rest Roast
Once the internal temperature is achieved, carefully remove the roast from the oven and tent it loosely with foil. Let it rest for about 20 minutes, allowing the juices to redistribute throughout the meat. This essential step lends to a succulent and tender texture in your Reverse Sear Prime Rib.
Step 6: Sear
Heat a cast iron skillet over high heat until smoking hot. Carefully transfer the rested roast to the skillet, searing each side for 1-2 minutes until you achieve a beautifully caramelized crust. This quick sear will elevate the flavor profile, creating a delectable contrast with the juicy interior.
Step 7: Final Rest
After searing, allow the roast to rest again for an additional 3-5 minutes. This final rest is crucial for maintaining moisture as you prepare to carve the roast into half-inch thick slices. The strength of the Reverse Sear Prime Rib will shine through in each succulent bite.

What to Serve with Reverse Sear Prime Rib
Enhance the experience of your delicious prime rib with these delightful pairings that will complement every bite.
-
Creamy Mashed Potatoes: A classic pairing, these buttery potatoes soak up the savory juices, creating a harmonious blend of flavors.
-
Garlic Roasted Baby Carrots: Sweet and tender, these carrots bring a beautiful color to your plate while adding a touch of natural sweetness to balance the richness of the beef.
-
Yorkshire Puddings: These light and airy pastries are perfect for scooping up the savory juices from your prime rib and add a comforting touch to the meal.
-
Simple Salad with Lemon Vinaigrette: Crisp greens with a bright dressing provide a refreshing contrast, cleansing the palate between rich bites.
-
Herb-Infused Rice Pilaf: Fluffy rice studded with fragrant herbs rounds out the meal, providing a lovely textural contrast to the juicy prime rib.
-
Red Wine: A full-bodied Cabernet Sauvignon elevates the dining experience, enhancing the umami flavor of the roast and creating a cozy atmosphere.
With these delightful options, your Reverse Sear Prime Rib will shine as the centerpiece of a truly unforgettable meal.
Reverse Sear Prime Rib Variations
Feel free to get creative with your Reverse Sear Prime Rib and make it uniquely yours!
-
Herb Variations: Experiment with different herbs like sage, garlic, or oregano in the butter for more flavor depth. Each herb can bring a new twist to the dish, enhancing its aromatic qualities wonderfully.
-
Spice Infusion: Add a blend of spices such as paprika or cumin to the seasoning mix. This addition can introduce a delightful warmth and complexity, taking your flavor experience to the next level.
-
Marinade Twist: Instead of just seasoning, marinate the prime rib in red wine and garlic overnight. The acidity from the wine tenderizes the meat while imparting a rich, layered flavor that will astound your guests.
-
Smokiness Touch: Use a smoker to cook the prime rib instead of a standard oven. This method adds a tantalizing smoky flavor that pairs beautifully with the natural richness of the beef.
-
Heat Index: For a bit of kick, mix some chili powder or cayenne pepper into your herb butter. This extra heat can create a memorable contrast with the savory elements of the dish.
-
Mustard Base: Try slathering a thin layer of Dijon mustard on the roast before applying your herb butter. It adds a lovely tanginess that perfectly complements the rich beef.
-
Balsamic Glaze: Drizzle some balsamic reduction over the roast after cooking for a sweet and tangy kick. This finishing touch elevates the dish, providing a beautiful glaze and depth of flavor.
-
Serve with Flair: Pair your prime rib with a creamy horseradish sauce or a zesty chimichurri for an exciting contrast. These sides can enhance the meal’s experience, appealing to various taste preferences.
Expert Tips for Reverse Sear Prime Rib
Digital Thermometer: Monitor the internal temperature with a digital probe thermometer to achieve consistent and perfect results every time.
Flavor-Rich Resting: Let the roast rest before and after searing to ensure the flavorful juices redistribute evenly throughout the meat.
High Heat Searing: Make sure your cast iron skillet is extremely hot before adding the roast; this is key to achieving that beautifully caramelized crust.
Room Temperature Rule: Always allow the roast to reach room temperature prior to cooking; this helps in achieving an evenly cooked Reverse Sear Prime Rib.
Herb Substitution: Feel free to experiment with different herbs in your butter mix—sage and garlic can add exciting flavors to your prime rib.
Make Ahead Options
These Reverse Sear Prime Rib preparations are ideal for busy home cooks looking to save time without sacrificing flavor! You can season the roast with kosher salt and refrigerate it for up to 24 hours to allow for an enriched taste. Furthermore, the herb butter can be made in advance and stored in the refrigerator to ensure freshness. When you're ready to cook, simply let the roast sit at room temperature for about an hour, then proceed with the slow-roasting instructions until it reaches the desired internal temperature. Resting it before and after searing will maintain its juiciness, ensuring a restaurant-quality meal that's just as delicious as when freshly prepared!
How to Store and Freeze Reverse Sear Prime Rib
Fridge: Wrap leftovers tightly in foil or an airtight container and store them in the refrigerator for up to 3 days to maintain freshness and flavor.
Freezer: For longer storage, slice the prime rib and freeze in individual portions wrapped securely in foil or freezer-safe bags for up to 2-3 months.
Reheating: To enjoy your prime rib, reheat it in the oven at 275°F (135°C), covered loosely with foil for about 15 minutes. This helps preserve moisture for a juicy experience.
Thawing: When ready to enjoy your frozen prime rib, thaw in the refrigerator overnight before reheating to ensure even warming and maintain flavor.

Reverse Sear Prime Rib Recipe FAQs
What should I look for when selecting a prime rib?
Look for a prime rib with good marbling—those little flecks of fat that ensure juicy, flavorful meat. The color should be a bright red, with a firm texture, and a fresh smell. Avoid any with dark spots or an off-putting odor, as these are signs of spoilage.
How do I store leftover Reverse Sear Prime Rib?
After enjoying your delicious prime rib, wrap any leftovers tightly in foil or store them in an airtight container. Keep them in the refrigerator for up to 3 days, ensuring they remain juicy and flavorful.
Can I freeze leftover prime rib?
Absolutely! For longer shelf life, freeze your sliced prime rib in individual portions. Wrap securely in foil or use freezer-safe bags. This way, you can enjoy it for up to 2-3 months. Just remember to label with the date for easy reference!
What’s the best way to reheat leftover prime rib without losing moisture?
To reheat, preheat your oven to 275°F (135°C). Place the prime rib in an oven-safe dish and cover loosely with foil to trap moisture. Heat it gently for about 15 minutes, checking until warmed through. This method helps maintain that incredible juiciness!
Can pets eat Prime Rib?
While dogs can enjoy small pieces of plain, cooked beef, be cautious of seasoning and fats. It’s best to offer only plain slices without any herbs, butter, or spices, as these can be harmful to pets. Always consult your vet if unsure.
What can I do if my prime rib turns out tough?
If your prime rib is tough, it's likely due to overcooking. For future attempts, use a meat thermometer to ensure you’re reaching the ideal internal temperature of 115°F (about 3½ to 4 hours at 200°F). Also, make sure to let the meat rest properly for the juices to redistribute. If your roast is already tough, try slicing it thinly against the grain to make it more tender.
Discover the Juiciest Reverse Sear Prime Rib Recipe Ever
Ingredients
Equipment
Method
- Generously season the prime rib with kosher salt and place it uncovered on a rack in the refrigerator overnight.
- Remove the roast from the fridge about an hour before cooking to bring it to room temperature.
- In a mixing bowl, combine the softened butter with rosemary, thyme, and black pepper.
- Preheat your oven to 200°F (93°C) and place the roast in a roasting pan fitted with a rack.
- Cook until the internal temperature reaches 115°F, about 3½ to 4 hours.
- Let the roast rest for 20 minutes under foil to redistribute juices.
- Sear the roast in a hot cast iron skillet for 1-2 minutes on each side until caramelized.
- Allow the roast to rest again for 3-5 minutes before carving into half-inch thick slices.
Leave a Reply