
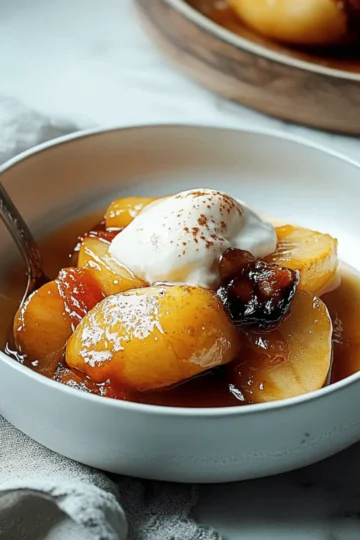
As the aroma of cinnamon fills my kitchen, I can’t help but feel a wave of comfort wash over me—it’s that enchanting time of year when I whip up Easy Baked Pears with Maple and Cinnamon. This delightful dessert transforms simple, juicy pears into a celebration of cozy flavors, making it ideal for a quick treat or a special gathering. Not only is this recipe gluten-free, but it's also remarkably adaptable, allowing you to add your favorite toppings to suit any occasion. Imagine serving these warm, caramelized beauties topped with a dollop of yogurt or a sprinkle of granola, transforming them into a standout dish! Are you ready to explore the warm embrace of baked pears? Let’s dive in and create a sweet moment you'll cherish!

Why Are Baked Pears So Irresistible?
Sweet, Fruity Goodness: Baked pears offer a delightful sweetness, enhanced by caramelization, making them an unforgettable dessert.
Warm and Cozy: The combination of cinnamon and maple syrup creates a comforting aroma that fills your home as they bake.
Quick and Easy: With minimal prep, this recipe comes together effortlessly—perfect for anyone in a rush!
Versatile Toppings: Dress them up with Greek yogurt, granola, or nuts for an extra crunch. Explore various options to create your signature dish!
Impressive Presentation: These baked beauties are visually stunning, making them ideal for entertaining guests or treating yourself to something special.
Crowd-Pleasing Delight: Gluten-free and adaptable, they cater to diverse dietary needs, ensuring everyone can indulge in this tasty treat!
Baked Pears Ingredients
• To create the magic of baked pears, gather a handful of simple yet essential ingredients!
For the Pears
- Pears – Choose ripe yet firm varieties like Bartlett, Bosc, or Anjou for optimal sweetness and texture.
- Ground Cinnamon – This adds warmth and depth; feel free to increase the amount for a spice boost!
- Pure Maple Syrup – Provides natural sweetness; can be swapped with honey or agave nectar, but flavor will differ.
- Vanilla Extract – Helps to enhance the overall flavor profile; skip it if you prefer a more straightforward treat.
Optional Toppings
- Greek Yogurt – Adds creaminess and protein; perfect for breakfast or a delicious dessert.
- Maple Almond Granola – Sprinkle on top for added crunch and nutty flavor; a delightful textural contrast with soft pears!
- Honey Drizzle – Use for extra sweetness just before serving; complements the pear’s natural flavors beautifully.
- Toasted Nuts – Almonds or walnuts bring richness and crunch, elevating your baked pears to a new level!
With these simple ingredients, you're on your way to creating a delicious dish of baked pears that will warm your heart and home!
Step‑by‑Step Instructions for Easy Baked Pears
Step 1: Preheat Your Oven
Begin by preheating your oven to 375°F (190°C) to ensure it's hot and ready to bake your pears. This temperature is perfect for achieving that caramelized, golden-brown finish. While the oven warms up, gather your ingredients and prepare for the next steps, building excitement for the deliciousness ahead!
Step 2: Prepare the Baking Pan
Take a large baking pan and coat it with a light spray of cooking oil or line it with parchment paper. This will prevent the glazed pears from sticking, making serving and cleanup a breeze. Make sure the pan is large enough to accommodate all your pear halves placed side by side without crowding.
Step 3: Slice the Pears
Carefully slice your ripe yet firm pears in half lengthwise, and use a spoon or melon baller to scoop out the seeds and core. This step not only prepares the pears for baking but also creates a lovely cavity for the syrup to pool in. Place the halved pears cut side up in your prepared baking pan once you’re done.
Step 4: Season with Cinnamon
Generously sprinkle the halved pears with ground cinnamon, ensuring each piece is well-coated with that warm spice. The cinnamon will enhance the natural sweetness of the pears as they bake. Take a moment to enjoy the fragrant aroma—it’s a sign that your Easy Baked Pears are on their way to being a cozy delight!
Step 5: Drizzle with Syrup
In a small bowl, combine pure maple syrup and vanilla extract to create a sweet drizzling mix. Generously pour this mixture over the sliced pears, allowing it to pool in the center of each half. The maple syrup will caramelize beautifully in the oven, giving your baked pears a luscious glaze and depth of flavor.
Step 6: Bake the Pears
Slide the baking pan into the preheated oven and let the pears bake uncovered for about 25 minutes. At the 20-minute mark, check for doneness; they should be soft to the touch and their edges caramelized to a beautiful golden brown. This ensures your Easy Baked Pears have that tender texture everyone loves.
Step 7: Cool and Serve
Once baked to perfection, carefully remove the pears from the oven and allow them to cool slightly for a few minutes. This step makes them easier to handle and enhances the flavors. Serve the warm baked pears as is, or add a dollop of Greek yogurt or a sprinkle of granola for an extra touch of indulgence.

Baked Pears Variations & Substitutions
Feel free to get creative and make this recipe your own with these delightful variations!
- Dairy-Free: Exchange Greek yogurt for coconut yogurt or almond yogurt for a creamy, plant-based option.
- Nut-Free: Omit nuts and consider adding coconut flakes for a tropical twist that still brings texture!
- Sweetener Swap: Try brown sugar or coconut sugar instead of maple syrup for a different flavor depth.
- Spice it Up: Add a pinch of ginger or allspice for an adventurous kick to the classic cinnamon flavor.
- Berry Boost: Top with fresh berries or a berry compote to introduce a tart contrast against the sweet pears.
- Syrup Alternatives: Use agave nectar or honey for drizzling, enhancing the natural sweetness without added sugar flavors.
- Oven-Free Option: For a quick treat, sauté pear halves in a skillet with butter and brown sugar until caramelized.
- Choco-Lover: Melt dark chocolate and drizzle over baked pears just before serving for a decadent finish!
With so many exciting possibilities, there’s no end to the enjoyment that baked pears can bring! Whether you prefer a classic approach or want to experiment, feel free to explore the world of flavors that this dish can hold. And don’t forget to explore other impressive dessert ideas for more inspiration!
Make Ahead Options
These Easy Baked Pears are perfect for meal prep enthusiasts! You can slice and core the pears up to 24 hours in advance and store them in a sealed container with a bit of lemon juice to prevent browning. Additionally, you can mix the cinnamon, maple syrup, and vanilla ahead of time and refrigerate it for up to 3 days. When you’re ready to enjoy your delicious dessert, simply arrange the prepared pears in your baking pan, drizzle with the syrup mixture, and bake as directed. This way, you’ll have a warm, comforting treat with minimal effort, letting you savor this delightful dish even on your busiest days!
What to Serve with Easy Baked Pears
Pair your delicious creation with these delightful accompaniments that perfectly complement the lusciousness of your baked pears.
-
Creamy Greek Yogurt: A dollop adds a luscious creaminess, balancing the natural sweetness of the pears with its tanginess.
-
Crunchy Granola: Add a sprinkle for a delightful crunch, enhancing texture and offering a satisfying contrast to the soft, warm pears.
-
Vanilla Ice Cream: A scoop of this classic favorite melts beautifully over the warm pears, creating a heavenly combination of flavors and temperatures.
-
Toasted Nuts: Almonds or walnuts bring a nutty richness, adding depth while introducing a lovely crunch that elevates the dish.
-
Cinnamon Sugar Sweet Rolls: For a heartwarming breakfast treat, pair these rolls alongside your baked pears for a cozy, flavorful morning experience.
-
Honey Drizzle: A touch of honey right before serving enhances the sweetness, creating an indulgent, caramel-like flavor that ties everything together.
-
Sparkling Apple Cider: Serve chilled for a refreshing drink option that beautifully mirrors the fruity essence of the pears and complements their warmth.
-
Spiced Chai Latte: A warm, fragrant chai latte makes for a comforting drink pairing, echoing the cozy spices in your baked pears.
Drawing these pairs together creates an experience woven with warmth and richness, inviting everyone to delight in each delicious bite!
Expert Tips for Baked Pears
Choose the Right Pears: Ripe but firm pears like Bartlett or Bosc work best; they maintain their shape while baking.
Watch the Time: Check your baked pears at the 20-minute mark to avoid overbaking, ensuring they remain tender but not mushy.
Customize Wisely: Feel free to add spices like nutmeg or cardamom for a unique twist, but keep the balance in mind to enhance, not overwhelm, the flavor.
Perfect the Drizzle: If using maple syrup, ensure it's pure for the best flavor; if substituting, note that honey or agave will create a different taste profile.
Serving is Key: Consider topping with Greek yogurt or toasted nuts for added texture and flavor contrast with the sweet baked pears.
How to Store and Freeze Baked Pears
Fridge: Store leftover baked pears in an airtight container for up to 5 days. Allowing flavors to meld overnight makes them even tastier, creating a delightful treat!
Freezer: To freeze, place the pears in a single layer on a baking sheet, then transfer to a freezer-safe bag once solid. They'll stay fresh for up to 3 months; simply thaw in the fridge overnight before reheating.
Reheating: For the best texture, reheat thawed baked pears in a 350°F (175°C) oven for about 10-15 minutes. This will revive their warmth and delicious caramelized edges.

Easy Baked Pears Recipe FAQs
What type of pears should I use for baking?
Absolutely! You’ll want to choose ripe yet firm varieties like Bartlett, Bosc, or Anjou for the best results. They offer natural sweetness and maintain their shape during baking, resulting in tender, yet nicely textured baked pears.
How do I store leftover baked pears?
Very easy! Store any leftover baked pears in an airtight container in the fridge for up to 5 days. The flavors actually deepen overnight, making them even more delicious the next day, ideal for a quick snack or dessert!
Can I freeze baked pears?
Certainly! To freeze, first place the baked pears in a single layer on a baking sheet and put them in the freezer until solid. Then, transfer the frozen pears to a freezer-safe bag, where they can last up to 3 months. When you’re ready to enjoy them, thaw in the fridge overnight and reheat in a 350°F oven for about 10-15 minutes to revive their luscious texture.
Why are my baked pears mushy?
If your baked pears turn out mushy, it might be because they were overbaked. Always check for doneness at the 20-minute mark, aiming for soft pears with caramelized edges but still holding their shape. In the future, keep a close eye on them after they reach that sweet spot!
Are baked pears safe for pets?
Absolutely! Baked pears are generally safe for pets, but it's important to make sure there are no added sugars or spices that can be harmful to them. Always consult your vet if you're unsure about introducing any new food to your pet’s diet.
Can I make these baked pears vegan?
Yes, indeed! To make the baked pears vegan, simply skip any dairy toppings like Greek yogurt and replace them with plant-based alternatives, such as almond yogurt or coconut whipped cream. The rest of the recipe remains completely vegan-friendly!

Deliciously Easy Baked Pears with Maple and Cinnamon
Ingredients
Equipment
Method
- Preheat your oven to 375°F (190°C).
- Prepare the baking pan with cooking oil or parchment paper.
- Slice pears in half lengthwise and scoop out the seeds.
- Sprinkle cinnamon over halved pears.
- Mix maple syrup and vanilla extract; drizzle over pears.
- Bake in the preheated oven for about 25 minutes, checking at 20 minutes.
- Cool for a few minutes before serving.
Leave a Reply