
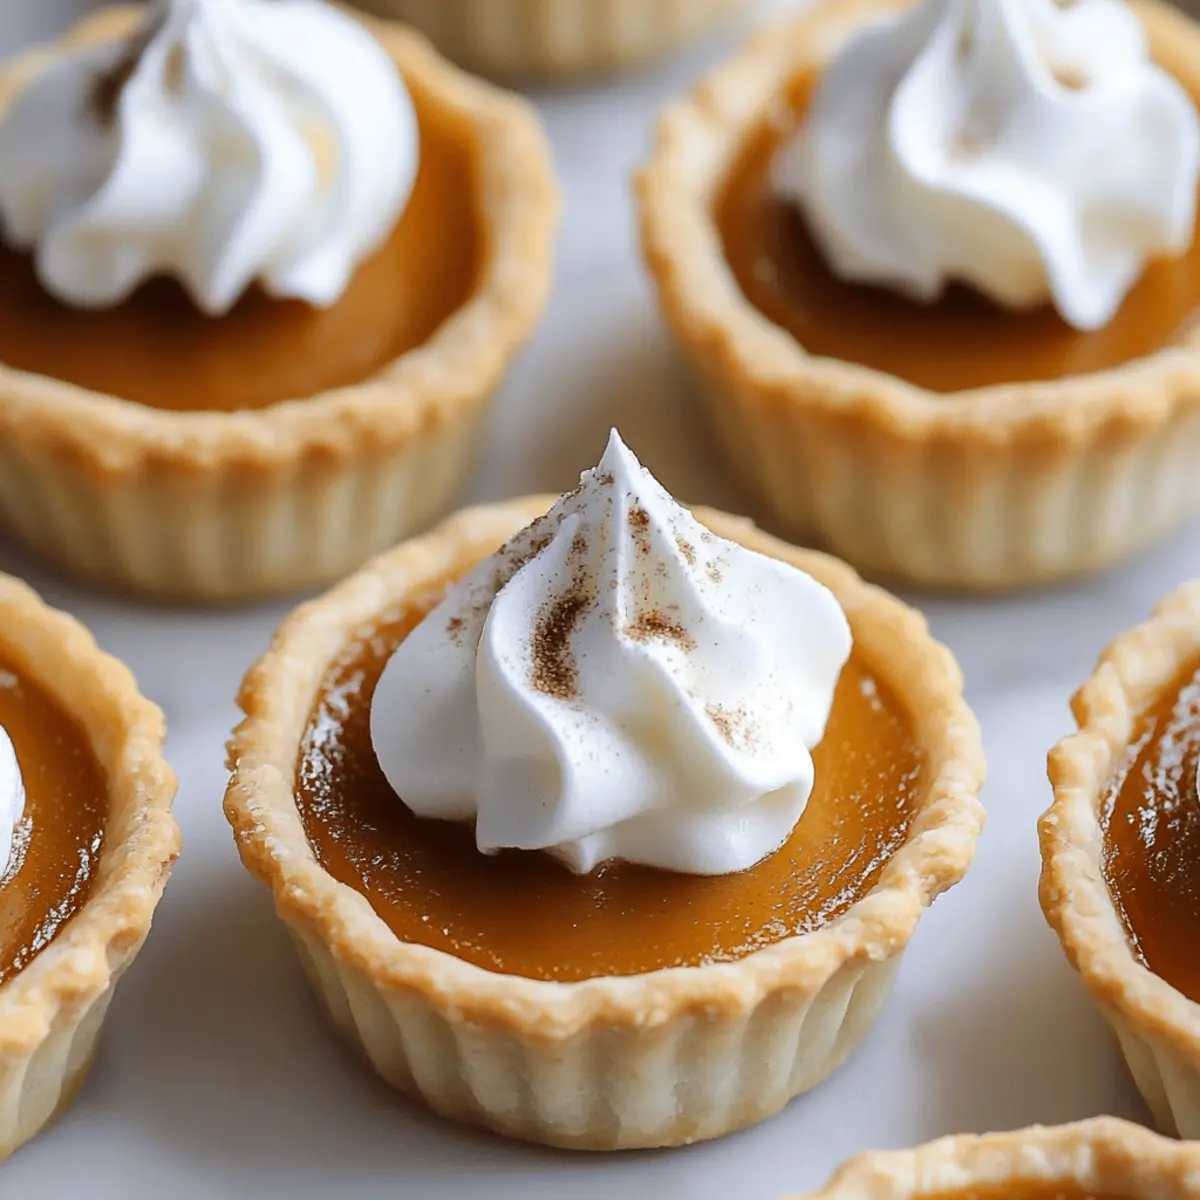
The aroma of autumn fills the kitchen as I take a moment to savor a slice of cozy nostalgia. These Mini Maple Pumpkin Pies are not just your average fall dessert—they're delightful little wonders that put a charming spin on the traditional pumpkin pie. Filled with a creamy, maple-kissed pumpkin filling and enveloped in a tender crust, they make for the perfect addition to any gathering or celebration. One of the best perks? They’re easily adaptable, allowing you to get creative with flavors and toppings to suit your mood or dietary needs, whether you want a gluten-free version or a sweet twist! What's more, these mini delights can be prepped in a breeze, freeing up time for yourself or loved ones to share in the warmth of the season. Ready to learn how to whip up these inviting bites? Let’s dive into the recipe that will have everyone asking for seconds!

Why are Mini Maple Pumpkin Pies a Must-Try?
Delightful Size: These mini treats are perfect for sharing, effortlessly adding charm to any gathering.
Flavor Fusion: The maple-infused pumpkin filling offers a unique twist on the classic flavor profile that everyone loves, engaging your taste buds with cozy, autumnal notes.
Versatile Options: Customize to your heart's content with gluten-free crusts, different spices, or toppings like toasted pecans to tailor them to your guests’ preferences.
Quick and Simple: With easy-to-follow steps, you'll have these beauties baking in no time, allowing you to savor the season without the stress.
Crowd-Pleaser: Their adorable size and delicious taste guarantee they'll be the talk of the table, perfect for fall festivities or holiday celebrations.
Treat yourself and experiment with delicious alternatives like whipped cream or a side of spiced chai latte for an even more indulgent experience!
Mini Maple Pumpkin Pie Ingredients
• These essential ingredients will help you create delectable Mini Maple Pumpkin Pies that will charm everyone at your gathering.
For the Pie Filling
- Pumpkin Puree – Adds the classic pumpkin flavor and creamy texture; canned pumpkin puree works wonderfully!
- Light Brown Sugar – Provides sweetness and enhances the caramel notes in the filling; use dark brown sugar for a richer taste.
- Granulated Sugar – Balances the richness of the filling; feel free to omit if you prefer a less sweet version.
- Pumpkin Pie Spice – Combines warm spices for that quintessential autumn flavor; you can substitute with individual spices like cinnamon or nutmeg if desired.
- Egg – Binds the filling together and helps it set; try flaxseed meal for a vegan option.
- Maple Extract – Infuses a distinct depth of flavor; vanilla extract can be a suitable substitute if necessary.
- Evaporated Milk – Provides a rich, creamy texture; coconut milk makes a great dairy-free alternative.
For the Pie Crust
- Pie Dough – Forms the crust for your pies; you can choose store-bought or homemade, and ensure it's gluten-free if needed for dietary preferences.
Get ready for a delightful baking experience with these Mini Maple Pumpkin Pies, sure to brighten any fall celebration!
Step‑by‑Step Instructions for Mini Maple Pumpkin Pies
Step 1: Preheat the Oven
Begin by preheating your oven to 350°F (175°C). This step ensures that the Mini Maple Pumpkin Pies bake evenly, resulting in a perfectly set filling and a beautifully golden crust. As the oven warms up, gather your ingredients and prepare your workspace to make the process smooth and enjoyable.
Step 2: Prepare the Crusts
Roll out your pie dough on a lightly floured surface until it’s about ¼ inch thick. Using a 4-inch cutter, cut out 12 rounds and gently press them into a greased cupcake pan. The dough should fit snugly while creating a slight edge above the pan, adding a charming touch to your Mini Maple Pumpkin Pies.
Step 3: Mix the Filling
In a large mixing bowl, combine the pumpkin puree, light brown sugar, granulated sugar, pumpkin pie spice, egg, maple extract, and evaporated milk. Whisk the mixture until smooth and well combined, ensuring all ingredients are fully integrated. The filling should be silky and fragrant, promising a delightful flavor for your Mini Maple Pumpkin Pies.
Step 4: Fill the Crusts
Carefully fill each crust with the pumpkin mixture, pouring gently to leave a small rim of crust around the edge. This is crucial to prevent spillage during baking while ensuring each pie gets the rich, creamy filling they deserve. Aim for an even distribution to maintain consistency across your mini creations.
Step 5: Bake the Pies
Place the filled cupcake pan in the preheated oven and bake for 25-30 minutes. You’ll know your Mini Maple Pumpkin Pies are ready when the filling is set and the crusts are golden brown. The edges should be slightly puffed, creating a delightful contrast between the creamy filling and the tender crust.
Step 6: Cool the Pies
Once baked, turn off the oven and crack the door open. Let the Mini Maple Pumpkin Pies cool inside the oven for about 10-15 minutes, as this gradual cooling helps prevent cracks in the filling. The warm air will allow the pies to set perfectly for a rustic presentation.
Step 7: Serve with Whipped Cream
When ready to serve, top each Mini Maple Pumpkin Pie with a dollop of whipped cream. For an elegant touch, pipe the whipped cream using a star tip. These delightful toppings elevate the pies, making them not only delicious but visually appealing for any fall gathering or celebration.
Mini Maple Pumpkin Pies Variations & Substitutions
Feel free to explore the endless possibilities by customizing your Mini Maple Pumpkin Pies with these delightful twists and substitutions!
- Gluten-Free Crust: Use a sturdy gluten-free pie dough option to cater to gluten-sensitive friends and family.
- Dairy-Free Delight: Substitute evaporated milk with coconut milk for a rich, creamy filling that’s entirely dairy-free.
- Vegan Friendly: Replace the egg with 1 tablespoon of flaxseed meal mixed with 2.5 tablespoons of water for a perfect egg alternative.
- Spice It Up: Add a pinch of cayenne pepper or freshly grated ginger for a little heat and depth that will elevate the flavors.
- Nutty Toppings: Finish with a sprinkle of toasted pecans or walnuts on top of the whipped cream to introduce a delightful crunch.
Imagine cozy gatherings filled with laughter and joy around the table. These variations will surely impress your guests, whether you choose to stick to the classics or experiment with new flavors!
- Flavor Extravaganza: Swap maple extract for almond or hazelnut extract to give the filling a unique twist that is both memorable and delicious.
- Sweet and Savory: Consider drizzling a touch of balsamic reduction over the whipped cream for an unexpected flavor adventure that contrasts sweet and tart beautifully.
- Fruit Forward: Top your mini pies with caramelized apples for a warm, inviting flavor that ties perfectly with the fall theme.
Enjoy this journey of flavor and creativity as you bake your way to deliciousness! If you're feeling adventurous, be sure to check out how to make spiced chai latte to accompany your delightful pies.
Expert Tips for Mini Maple Pumpkin Pies
• Prevent Overfilling: Always leave a small rim of crust when filling to avoid spillage during baking, ensuring perfect pies.
• Warm Cooling: After baking, let the pies cool in the oven with the door cracked to avoid cracks in the filling.
• Elegant Presentation: Use a star tip to pipe whipped cream for a visually appealing finish that enhances your Mini Maple Pumpkin Pies.
• Taste Test: Adjust sweetness to your liking; start with less sugar and add more if desired for that perfect flavor balance.
• Ingredient Substitutions: Don't hesitate to swap ingredients according to dietary needs; there are plenty of gluten-free and dairy-free options available.
Storage Tips for Mini Maple Pumpkin Pies
Room Temperature: Allow the pies to cool completely before leaving them at room temperature for up to 2 hours, as this keeps their delicious texture intact.
Fridge: Store leftover Mini Maple Pumpkin Pies in an airtight container in the fridge for up to 4 days. This keeps the filling fresh and creamy, ready for indulgent snacking!
Freezer: For longer storage, freeze the baked pies (without whipped cream) for up to 2 months. Thaw in the fridge overnight before serving, then add cream for a delightful treat.
Reheating: To reheat, warm the pies in a preheated oven at 350°F (175°C) for about 10-15 minutes until heated through. Enjoy that cozy flavor all over again!
What to Serve with Mini Maple Pumpkin Pies
The comforting flavors of fall seamlessly extend into your meal with these delightful pairings!
-
Apple Cider: The crisp, sweet notes of apple cider perfectly complement the rich, maple-infused pumpkin, enhancing your sensory experience.
-
Spiced Chai Latte: Warm, fragrant, and cozy, this spiced drink envelops you in autumn bliss, making each bite of pie even more satisfying.
-
Whipped Cream: A must-have topping for these mini pies, its creamy texture adds a lightness that beautifully balances the dense filling.
-
Toasted Pecans: Adding a crunchy element, toasted pecans provide a nutty depth that pairs wonderfully with the soft, sweet filling.
-
Vanilla Ice Cream: The smooth creaminess of vanilla ice cream contrasts beautifully with the warm spices, turning each bite into a comforting treat.
-
Cheese Board: A selection of mild cheeses alongside fresh fruits provides a savory contrast to the sweet mini pies, inviting guests to explore different flavors.
Pair any of these delightful additions with your Mini Maple Pumpkin Pies for a truly festive fall celebration!
Make Ahead Options
These Mini Maple Pumpkin Pies are perfect for meal prep, allowing you to enjoy a slice of fall magic with ease! You can prepare the pie crusts and fill them with the pumpkin mixture up to 24 hours in advance, simply covering the cupcake pan with cling wrap and refrigerating to maintain freshness. If you prefer, you can bake the pies ahead and store them in an airtight container in the fridge for up to 3 days. Just reheat them gently in the oven before serving, and add a fresh dollop of whipped cream for that delightful finishing touch. With these make-ahead options, you'll save valuable time during busy gatherings while still delivering delicious, homemade desserts that everyone will love!

Mini Maple Pumpkin Pies Recipe FAQs
What type of pumpkin puree should I use?
I recommend using canned pumpkin puree for ease and consistent flavor, as it’s perfectly smooth and ready to use. If you prefer, you can also make your own by roasting pumpkin and pureeing it, but canned works wonderfully!
How should I store leftover mini pies?
Store any leftovers in an airtight container in the fridge for up to 4 days. This keeps the creamy filling fresh and delicious, perfect for snacking or serving again!
Can I freeze Mini Maple Pumpkin Pies?
Absolutely! For longer storage, freeze the baked pies without whipped cream for up to 2 months. Just thaw them in the fridge overnight before serving. When you’re ready to enjoy, add fresh whipped cream for a delightful treat!
What if my filling cracked while baking?
No worries! If your filling cracks, it's often due to overbaking or moving them too soon from the oven. To prevent this, cool the pies in the oven with the door slightly ajar for about 10-15 minutes after baking. This gradual cooling helps set the filling without cracking.
Are there any dietary considerations with this recipe?
Yes! If you're making these Mini Maple Pumpkin Pies for guests, feel free to adapt ingredients based on dietary needs. You can use gluten-free pie dough for gluten sensitivities and coconut milk for a dairy-free option. Always double-check ingredients for potential allergens to ensure everyone can enjoy these delights!
What can I do to make the pies look more elegant?
To elevate your presentation, I often recommend piping whipped cream on top using a star tip. You can also decorate with toasted pecans or a sprinkle of cinnamon for that extra touch!

Indulgent Mini Maple Pumpkin Pies for Cozy Celebrations
Ingredients
Equipment
Method
- Preheat the oven to 350°F (175°C).
- Roll out your pie dough on a lightly floured surface until it’s about ¼ inch thick. Using a 4-inch cutter, cut out 12 rounds, and press them gently into a greased cupcake pan.
- In a large mixing bowl, combine the pumpkin puree, light brown sugar, granulated sugar, pumpkin pie spice, egg, maple extract, and evaporated milk. Whisk until smooth.
- Fill each crust with the pumpkin mixture, leaving a small rim to prevent spillage during baking.
- Bake for 25-30 minutes until the filling is set and the crusts are golden brown.
- Turn off the oven, crack the door open, and let the pies cool in the oven for about 10-15 minutes.
- Top each pie with a dollop of whipped cream when ready to serve.
Leave a Reply